The Distribution tab enables
you to select how you want to distribute scheduled output. ReportCaster
Administrators can specify which distribution methods will appear
in the Distribution tab using the Schedule Method setting in the
ReportCaster Server Configuration tool (for more information, see Specifying Schedule Method Settings). By default, you can distribute scheduled
output using one of the following methods:
You can only schedule multiple tasks when using the Email and
Printer distribution methods.
Distributing Scheduled Output Using E-mail
You
can distribute scheduled output as e-mail attachment(s) or inline
within the body of an e-mail message. Distributing scheduled output
as an inline e-mail message is particularly useful when output is
distributed to mobile devices, fax machines, or through e-mail systems
that do not support attachments. For more information about distributing scheduled
output to a fax machine, see Distributing Scheduled Output to a Fax Machine Using E-mail.
Note: The availability of the inline message option when
you create a schedule depends on the Inline Report Distribution
setting in the ReportCaster Server Configuration tool.
Procedure: How to Distribute Scheduled Output Using E-mail
-
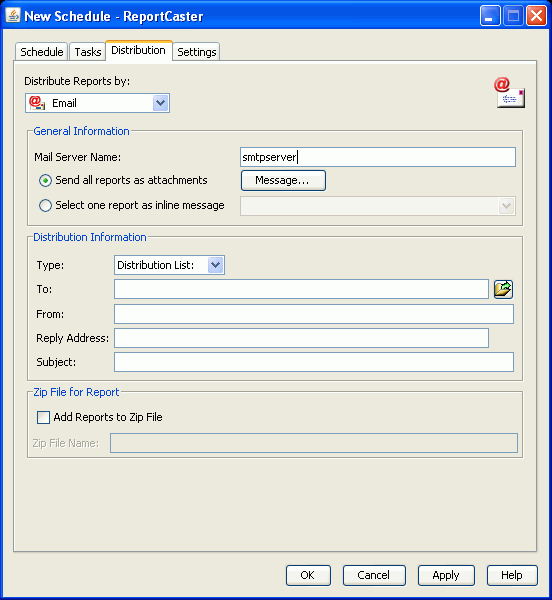
In the
Distribution tab, select Email from the Distribute
Reports by drop-down list. The following options appear.
-
In the
Mail Server Name field, the SMTP e-mail server specified in the ReportCaster
Server Configuration tool appears. You can accept the default e-mail server,
or type another name for the e-mail server that will distribute
the scheduled output. ReportCaster requires the SMTP server domain
name, not its IP address.
-
Specify whether you want to distribute
the scheduled output as one or more e-mail attachments, or inline
within the body of an e-mail message. (The availability of the inline
option depends on your ReportCaster configuration.)
Note: You can only distribute
one Task as an inline e-mail message. If you are scheduling multiple
Tasks using e-mail, the additional Tasks must be distributed as e-mail
attachments.
-
From
the Type drop-down list, select Distribution List, Distribution
File, Single Address, or Dynamic
Address.
-
Distribution List. You
can select a Distribution List by clicking the Choose
address
 button.
The following window opens showing the e-mail Distribution Lists
that you are the owner of, and all public e-mail Distribution Lists.
button.
The following window opens showing the e-mail Distribution Lists
that you are the owner of, and all public e-mail Distribution Lists.

From this screen, you can:
Create a new Distribution List by
clicking the New icon.
View or edit a Distribution List by
selecting the list and clicking the Edit icon.
The contents of the list can only be changed by the ReportCaster
Administrator or the owner of the Distribution List.
Delete a Distribution List by
selecting the list and clicking the Delete icon.
The Distribution List can only be deleted by the ReportCaster Administrator
or the owner of the Distribution List.
Refresh an Address Book to
display any new Distribution Lists that other users may have created.
Click OK to
return to the Distribution tab. For more information about Distribution
Lists, see Distribution List Overview.
-
Distribution File. In
the To field, type the full path and file name of an external distribution
file. The path and file name must be accessible to the ReportCaster
Distribution Server. For more information about external distribution files,
see Creating an External Distribution File.
-
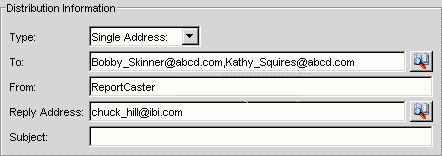
Single Address. In
the To field, type the e-mail address of the single recipient. ReportCaster
cannot validate the e-mail address. An incorrect or unresolved address
may not be noted in the log file. This is dependent upon the ability
of the SMTP mail server to validate the e-mail address. The SMTP
mail server will return undelivered e-mail messages to the reply
address you specify for the schedule.
Note: If the Email
Delivery, Restrict Email Domains option is set to yes in the ReportCaster
server configuration tool, then only those e-mail domains (the portion
of the e-mail address following the at symbol) listed in Allowed
Email Domains (also in the server configuration tool) are valid
e-mail recipients.
Tip: You can specify multiple e-mail
addresses with the Single Address option. In the To field, separate
each e-mail address with a comma or a semicolon. The e-mail addresses
will appear in the To: line of a single e-mail when the scheduled
output is distributed. Each individual e-mail address can be a maximum
of 130 characters as per SMTP specification. The total maximum length
of this field is 800 characters.
Additionally,
you can use group mail lists (defined on your mail server) with
the Single Address option. Group mail lists enable you to distribute
a report or notification to multiple recipients without having to
maintain multiple e-mail addresses in the ReportCaster Repository.
The format of the group mail list is dependent upon the mail server
being used. For example, if you are using a Microsoft Exchange Server
and your group mail list is defined as #group1, you would type group1@listdomain in
the Single Address field. If the group mail list contains a space
within its name, it must be enclosed within quotation marks. For
more information, see your mail server administrator.
Tip: You
can retrieve e-mail addresses defined in an LDAP data source. For
more details, see How to Retrieve E-mail Addresses for a Schedule Using Address Search.
-
Dynamic Address. You
can select a dynamic distribution list by clicking the Choose
address
button.
The Select Dynamic Address Procedure dialog box opens.
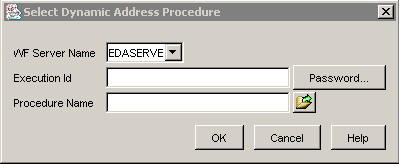
Specify
the WebFOCUS Reporting Server Name, the Execution ID and password
for the server, and the procedure name that creates the dynamic
distribution list. For more information about dynamic distribution
lists, see Creating a Dynamic Distribution List.
-
In the
From field, type any value (for example, the name of the person creating
the schedule). This field is not required by ReportCaster, but may
be required by your e-mail system. This field is disabled if you
are scheduling an alert when a Two-Way Email template is attached.
-
In the
Reply Address field, type a valid e-mail address. If recipients
reply to the e-mail, their messages will be sent to this address.
If your e-mail system is unable to deliver the content, the undelivered
output message is also returned to this address. This field is required
by ReportCaster. This field is disabled if you are scheduling an
alert when a Two-Way Email template is attached.
Tip: You can retrieve e-mail addresses defined in
an LDAP data source. For more details, see How to Retrieve E-mail Addresses for a Schedule Using Address Search.
-
In the
Subject field, type the text you want to appear in the message subject
line. This information is not required by ReportCaster, but may
be needed by your e-mail system. If you typed a value for the Description
in the Schedule tab, this value will be used as the default subject
value unless you decide to change it.
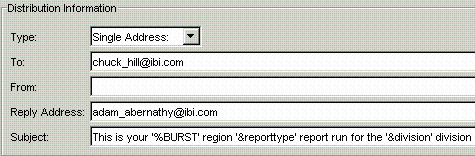
When creating a schedule, you can place multiple parameters
and burst values from the scheduled procedure in an e-mail subject
line. This allows the subject to be dynamically created in order
to personalize e-mails to recipients. Parameters referenced in the
subject line must be stored with the schedule information in the
ReportCaster tables.
Parameters must be specified in the format
'&parmname' (where parmname is the name of the
parameter). Burst values must be specified using the syntax '%BURST'.
Note:
- The parameter
name cannot also be the name of an existing WebFOCUS procedure.
You may specify an unlimited number of parameters.
- Burst values
are only retrieved from the first Task in a multi-Task schedule.
If you have multiple burst values in a Distribution List, only the
first value sent to the ReportCaster Distribution Server is included
in the subject.
For an example of specifying parameters
and burst values in an e-mail subject line, see Specifying Parameters and Burst Values in an E-mail Subject Line.
-
In the Zip File for Report section, choose whether or not to
Zip the reports related to this distribution.
If you select the Zip File for Report option, then enter
a name for the file in the Zip File Name field.
Note:
- The Default
Zip Minimum File Size setting in the ReportCaster Server Configuration
tool allows you to designate a file size that determines whether
or not the schedule output is zipped. If the scheduled output is
less than this value, it is not zipped, but if it is equal to or
greater than this value, it is automatically zipped. See General Configuration Settings.
- To control
whether or not .zip is automatically appended to the file name you enter
in the Zip File Name field, set the Add Zip Extension to Filename
if Not Specified setting in the ReportCaster Server Configuration
tool accordingly.
-
Click
the Settings tab (see Specifying Optional and Notification Settings).
Note: For
considerations you should be aware of when using a Microsoft Exchange
Server or cc:Mail, see Considerations When Distributing Scheduled Output Using E-mail.
Example: Specifying Parameters and Burst Values in an E-mail Subject Line
This schedule specifies burst values
and multiple parameters in the e-mail subject line:
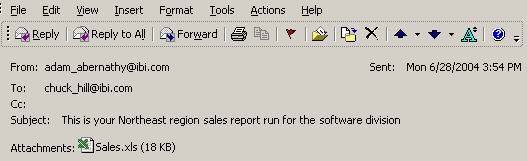
The above schedule might result in an
e-mail similar to the following:
Procedure: How to Retrieve E-mail Addresses for a Schedule Using Address Search
To
search for e-mail addresses to add to a schedule:
-
While
creating or editing a schedule, click the Address Search icon
that appears next to any field where you can specify e-mail addresses.
Note: The Address Search icon only appears if the
Email LDAP Enabled parameter is set to YES in the ReportCaster Server
Configuration tool. For more information, see LDAP Settings.
The
Address Search window opens.
-
Type the search string. You can search
using the following combinations:
-
Last Name [Equals |
Starts with | Ends with | Contains]
- First Name
[Equals | Starts with | Ends with | Contains]
- Email [Equals |
Starts with | Ends with | Contains]
For
example, if you type S after the Last Name Starts with field, ReportCaster retrieves
last names that start with the letter S:
Note: By
default, ReportCaster retrieves a maximum of 300 e-mail addresses.
You can change this default value for the duration of your session.
However, if you log out and log back in, the Address Search window
displays the default value of 300. ReportCaster allows the retrieval
of a maximum of 500 e-mail addresses. If you suspect your search
will return more than 500 records, you should refine your search criteria.
-
Click Search.
ReportCaster retrieves the specified names from the LDAP data source:
-
Select
the e-mail address(es) you want to use in your schedule. You can multi-select
e-mail addresses by pressing the Ctrl key or the Shift key.
-
Click
the field (for example, To) for which you want to insert the e-mail address(es)
within your schedule.
-
Click OK.
In this example, the e-mail addresses
are added to the To field of your schedule:
By
default, ReportCaster separates multiple e-mail addresses with a
comma. The e-mail addresses will appear in the To: line of a single
e-mail when the scheduled output is distributed.
Note: Repeat
these steps if you want to change your search criteria or insert
additional e-mail addresses into your schedule. If you insert additional
e-mail addresses while the original e-mail addresses are selected,
the new e-mail addresses will replace the old ones. If your cursor
is positioned after the original e-mail addresses, the new e-mail
addresses will be appended to the old ones, separated by a comma.
However, be aware that the maximum number of characters is 800 when
inserting addresses.
Example: Distributing Scheduled Output to a Fax Machine Using E-mail
To
send an inline e-mail message to a fax machine, you must register
your e-mail address with a third-party e-mail distribution provider.
The features offered by providers, (such as supported area codes
and file formats), in addition to requirements on the structure
of e-mail parameter values, may vary. It is important that you select
a provider whose features are compatible with ReportCaster.
The following example shows how to distribute
scheduled output directly to a fax machine. The e-mail address,
john_doe@ibi.com, was registered with the e-mail distribution provider
called emfax.com. During the processing of the request, ReportCaster generates
the scheduled output and then distributes it using the e-mail address
of emfax.com. The reply address specified in ReportCaster
is the registered e-mail address that will be validated by emfax.com.
If the e-mail address is valid, emfax.com will distribute
the scheduled output to the fax number 12129999999. The validation
of the registered e-mail address is performed by emfax.com,
not by ReportCaster.
Note: The syntax used in this
illustration is specific to this example. The required syntax for
your provider may be different.
- In the Distribution
tab, select Email from the Distribute Reports
by drop-down list. The following options appear.
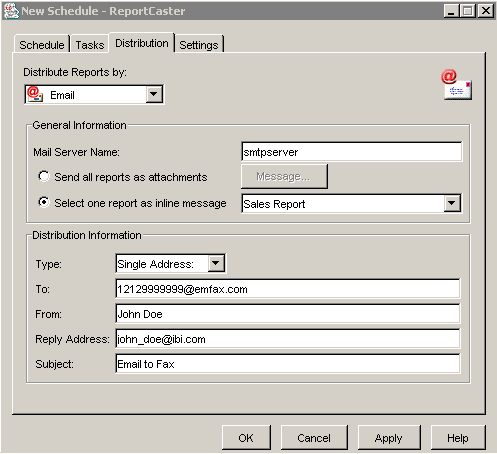
- In the Mail
Server Name field, the SMTP e-mail server specified in the ReportCaster Server
Configuration tool appears. You can accept the default e-mail server,
or type another name for the e-mail server that will distribute
the scheduled output. ReportCaster requires the SMTP server domain
name, not its IP address.
- Select the Select
one report as inline message option button. Select the
report (for example, Sales Report) from the drop-down list, which displays
any Tasks created for this schedule in the Tasks tab.
Note: You
cannot distribute an e-mail attachment to a fax machine.
- From the Type
drop-down list, select Single Address from the
drop-down list.
- In the To field,
type the e-mail address to be used by the e-mail provider according
to their requirements. In this example, it is phone-number@emfax.com or
12129999999@emfax.com (where emfax.com is the name
of your e-mail provider).
Note: You can also select a Distribution
List, Distribution File, or a Dynamic Address.
However, be sure to use the syntax required by your provider.
- In the From
field, type any value (for example, the name of the person creating
the schedule). This field is not required by ReportCaster, but may
be required by your e-mail system. This field is disabled if you
are scheduling an alert when a Two-Way Email template is attached
- In the Reply
Address field, type your registered e-mail address. If your e-mail
system is unable to deliver the content, the undelivered output
message is returned to this address. This field is required by ReportCaster.
This field is disabled if you are scheduling an alert when a Two-Way
Email template is attached
- In the Subject
field, type the text you want to appear in the message subject line. This
information is not required by ReportCaster, but may be needed by
your e-mail system or e-mail provider. If you typed a value for
the Description in the Schedule tab, this value is used as the default
subject value unless you change it.
- Click the Settings tab
(see Specifying Optional and Notification Settings).
Reference: Considerations When Distributing Scheduled Output Using E-mail
Note: If
the Email Delivery, Restrict Email Domains option is set to yes
in the ReportCaster server configuration tool, then only those e-mail
domains (the portion of the e-mail address following the at symbol)
listed in Allowed Email Domains (also in the server configuration
tool) are valid e-mail recipients. The Distribution Server will
not deliver output to an e-mail address whose domain is not on this
list. Instead, the schedule will fail and an error message is written
to the ReportCaster log.
ReportCaster
transfers e-mail asynchronously to your e-mail system. The delivery
time depends upon your e-mail system.
Exchange Mail Server Considerations:
- If ReportCaster end users do not see
a From value that is specified in the schedule information for the
e-mail they receive in the e-mail client inbox, this is due to their
mail server configuration. For more information on how to control
this setting for a Microsoft Exchange Server, see the following
URLs:
Alternatively,
you can contact Microsoft customer support for assistance. If you
are using a mail server other than a Microsoft Exchange Server,
refer to that vendor's documentation or contact their customer support
for assistance.
- When distributing
a report to an Exchange Server, attachment names have a .txt extension
added to WP and DOC format output. This occurs because WP and DOC formats
are not mapped to a standard MIME type. The Exchange Server interprets
WP and DOC output as a text/plain MIME type and adds the .txt extension
to the end of the file name. For example, hold.wp.txt or hold.doc.txt.
- Exchange Server
individual recipient names (person@company.com) and Exchange
Server-defined distribution lists (list@company.com) can
be specified in ReportCaster Distribution Lists. However, Exchange
Server user-defined distribution lists cannot be referenced in a
ReportCaster Distribution List. They are defined internally on the
user's machine. The ReportCaster Distribution List is parsed by
the Exchange Server and not the user's mail client. Since a ReportCaster
Distribution List is parsed by the Exchange Server, when an external
server submits an Exchange Server distribution list, it must contain
the proper prefix and the proper domain (which is prefaced by an
@ sign). Consult your Exchange Server Administrator for these values.
CC:Mail Considerations:
When
you distribute ReportCaster generated e-mail attachments greater
than 20K in size to users of cc:Mail, cc:Mail renames the attachment
textitm.txt, ignoring the file name and extension supplied by the
user. This change affects DOC, HTML, and WP formats on UNIX and
Windows platforms. However, despite the naming convention issue,
the attachments contain the correct output and can be viewed if
the attachment is saved to disk with the correct extension.
Distributing Scheduled Output Using FTP or SFTP
The
following topics provide information about distributing scheduled
output using File Transfer Protocol (FTP) or SSH File Transfer Protocol
(SFTP). The benefit of using SFTP over FTP is that it encrypts the
data and user credentials distributed over the network. Host key fingerprints
are not used in this SFTP implementation.
Note:
- Both FTP and
SFTP distribution use an FTP distribution list.
- The SFTP distribution
method does not support Prepared Reports.
Procedure: How to Distribute Scheduled Output Using FTP or SFTP
The
following procedure shows how to distribute scheduled output using
FTP or SFTP. The SFTP distribution method does not support Prepared
Reports.
-
In the
Distribution tab, select FTP or SFTP from
the Distribute Reports by drop-down list.
The following image shows the New Schedule Distribution
tab for FTP distribution. The selection are the same for SFTP distribution.
-
In the
(S)FTP Server Name field, the (S)FTP server specified in the ReportCaster
Server Configuration tool appears. You can accept the default (S)FTP server,
or type another name for the (S)FTP server that will distribute
the scheduled output.
In this field, you can also designate a port for the (S)FTP
server other than the default assignment using the syntax, hostname:port.
-
In the
Directory field, type the destination to which the output will be sent.
- You cannot
create new Prepared Reports. However, all previously created Prepared
Reports will be supported.
- For WF Server
Procedures and Managed Reporting reports other than Prepared Reports,
specify the (S)FTP logon directory and path of the user ID to whose
account on the (S)FTP server the report will be sent.
- If left blank,
this specifies that WF Server Procedures distributed using (S)FTP will
be sent to the home directory of the (S)FTP user.
- If the (S)FTP
server resides on an OpenVMS file system, use UNIX-style directory
specifications.
- If the (S)FTP
server resides on a z/OS UNIX system in data set mode, you must type
a forward slash (/) as the first character for the directory.
- If the (S)FTP
server resides on a VM system, you must type ./ for the directory. This
will send reports to the default VM minidisk of the (S)FTP user.
Note: When
scheduling a Managed Reporting report from Domain Builder for (S)FTP
distribution, the maximum number of characters that can be specified
for the directory is 64, including the full path name.
-
In the
(S)FTP User and (S)FTP Security Information fields, type the user ID
and password for the (S)FTP server account to which the scheduled
output will be sent. You can specify a default (S)FTP user ID and
password within the ReportCaster Server Configuration tool.
-
From
the Distribution Information drop-down list, select Distribution
List, Distribution File, Single
Address, or Dynamic Address.
-
Distribution List. You
can select a Distribution List by clicking the Choose
address
button.
The following window opens showing the FTP Distribution Lists that
you are the owner of, and all public FTP Distribution Lists.
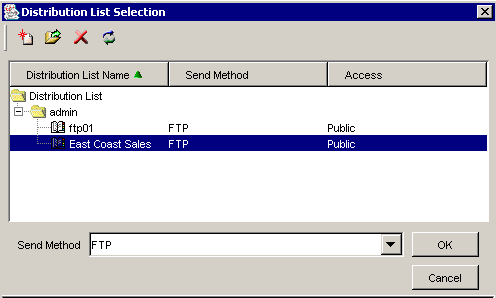
From this screen, you can:
Create a new Distribution List by
clicking the New icon.
View or edit a Distribution List by
selecting the list and clicking the Edit icon.
The contents of the list can be changed only by the ReportCaster
Administrator or the owner of the Distribution List.
Delete a Distribution List by
selecting the list and clicking the Delete icon.
The Distribution List can be deleted only by the ReportCaster Administrator
or the owner of the Distribution List.
Refresh an Address Book to
display any new Distribution Lists that other users may have created.
Click OK to
return to the Distribution tab. For more information about Distribution
Lists, see Distribution List Overview.
-
Distribution File. In
the To field, type the full path and file name of an external distribution
file. The path and file name must be accessible to the ReportCaster
Distribution Server. For more information about external distribution files,
see Creating an External Distribution File.
-
Single Address. In
the To field, type the FTP file of the single recipient. ReportCaster
cannot validate the FTP file. The burst option is not supported
with this distribution option. The maximum length of this field
is 800 characters.
-
Dynamic Address. You
can select a dynamic distribution list by clicking the Choose
address
button.
The Select Dynamic Address Procedure dialog box opens.
Specify
the WebFOCUS Reporting Server Name, the Execution ID and password
for the server, and the procedure name that creates the dynamic
distribution list. For more information about dynamic distribution
lists, see Creating a Dynamic Distribution List.
-
In the optional Index File for Report,
File Name field, specify a name for the index file of the report.
(Availability of this option is dependent on your ReportCaster configuration.)
- For Managed
Reporting reports, if you want to distribute the reports using the
Domain Prepared Reports folder, you must provide a file name. If the
report is burst, this will be the name of the index page containing
links to the burst sections. If the report is not burst, this will
be the name of the file.
- For WF Server
Procedures, if you are going to specify that the report is to be burst,
type the name of the file in which you want the index page to be
created.
The name of the index must be
typed in the case specific to your operating system.
The following table lists the case you
should use for a specific operating system:
|
Case
|
Operating System
|
|---|
|
Upper
|
z/OS
|
|
Lower
|
Windows
UNIX
|
Note: HTML, PDF, EXL2K, and (S)FTP
are the only formats that generate an index page for burst report
output. These index pages only contain the burst values specified
in the Distribution List.
-
In the Zip File for Report section, choose whether or not to
Zip the reports related to this distribution.
-
Select None if
you do not want to Zip the output.
-
Select Add
Reports to One Zip File to Zip the output in a single
file. Type a name for the file in the Zip File Name field.
-
Select Create
Separate Zip Files for Each Burst Value if the schedule
task is burst and you want separate Zip files rather than a single file.
Note:
- The Default
Zip Minimum File Size setting in the ReportCaster Server Configuration
tool allows you to designates a file size that determines whether
or not the schedule output is zipped. if the scheduled output is
less than this value, it is not zipped, but if it is equal to or
greater than this value, it is automatically zipped. See General Configuration Settings.
- To control
whether or not .zip is automatically appended to the file name you enter
in the Zip File Name field, set the Add Zip Extension to Filename
if Not Specified setting in the ReportCaster Server Configuration
tool accordingly.
-
Click
the Settings tab (see Specifying Optional and Notification Settings).
Reference: Considerations When Distributing Scheduled Output Using FTP or SFTP
The following are known limitations
when using (S)FTP distribution to a z/OS machine:
- EXL2K, EXL2K
FORMULA, EXL2K PIVOT, EXL2K TEMPLATE, and EXL97 formats are distributed
with .xls format. Internally, these formats must be set to binary in
the httpd.conf file.
- TABT format
must be imported into Microsoft Access in order to work properly.
- When the report
distributed is burst, the index page is generated with extra characters
preceding the burst values. The links on the page to the report
sections are correct.
- Additionally,
when using (S)FTP to transfer Cascading Style Sheet (CSS) files
from any platform to UNIX System Services, if the UNIX System Services
httpd.conf file contains the default MIME type of 8-bit for CSS
files, then the CSS files must be in binary mode.
- When distributing
scheduled output using SFTP, any file that is transferred in binary mode
will be readable when transferred between any platforms. Formats
that use a binary mode transfer are EXCEL, GIF, JPG, SVG, PNG, WK1,
and PDF.
A file in any other format will be transferred in text
mode as an ASCII file. Files in these formats are readable when
transferred to UNIX and Windows file systems. Files in these formats
that are transferred to a z/OS platform must be translated to EBCDIC before
they can be read. The following is the command to translate the
file:
iconv -fISO8859-1 -tIBM-1047 ascii.file > ebcdic.file
- Be sure to
use the z/OS DSname conventions when assigning a name to an FTP
or SFTP zip file that will be distributed to a z/OS MVS system.
If naming conventions are not followed, the schedule cannot be distributed
and an invalid data set name error is returned.
Reference: Distributing Scheduled Output to a PDA Using FTP or SFTP
If
you are distributing a report to a Palm™ Personal Digital Assistant
(PDA), you must select the DOC format and a .txt extension for the
report. The Palm Memo Pad application requires that all file names
end with the .txt extension. For more information about how to transfer reports
to a PDA using the HotSync process, see your PDA documentation.
Distributing Scheduled Output to a Printer
When
printing on Windows and UNIX, ReportCaster uses the lp (line printer)
protocol, which runs on top of TCP/IP to communicate to printers.
lp printing with the Novell Client is not supported. For printing
on z/OS, ReportCaster uses the lpr (line printer remote) UNIX command,
which has special options on the mainframe for sysout dest and class.
Note:
- Before creating
a schedule, Information Builders recommends verifying that you can
connect to your printer by test printing a document outside of ReportCaster.
- When creating
a File Task, only files with ASCII text formats (for example, HTML) can
be distributed to a printer. Files with binary formats (for example,
Excel) cannot be successfully distributed to a printer.
- When creating
a printer schedule on z/OS, the printer should be a SYSOUT class (such
as A) that has been routed to a printer. For example, you can indicate
that scheduled report output be distributed to a specific network
printer by typing the following printer identification
A DEST printserver
where:
- A
Is the SYSOUT class to be assigned to a network printer.
- printserver
Is the printer host name (for example, IBVM.P24E2).
Procedure: How to Distribute Scheduled Output to a Printer
-
In the
Distribution tab, select Printer from the
Distribute Reports by drop-down list. The following options appear.
-
From
the Distribution Information drop-down list, select Distribution
List, Distribution File, Single
Address, or Dynamic Address from
the drop-down list.
-
Distribution List. You
can select a Distribution List by clicking the Choose
address
button.
The following window opens showing the printer Distribution Lists
that you are the owner of, and all public printer Distribution Lists.
From this screen, you can:
Create a new Distribution List by
clicking the New icon.
View or edit a Distribution List by
selecting the list and clicking the Edit icon.
The contents of the list can be changed only by the ReportCaster
Administrator or the owner of the Distribution List.
Delete a Distribution List by
selecting the list and clicking the Delete icon.
The Distribution List can be deleted only by the ReportCaster Administrator
or the owner of the Distribution List.
Refresh an Address Book to
display any new Distribution Lists that other users may have created.
Click OK to
return to the Distribution tab. For more information about Distribution
Lists, see Distribution List Overview.
-
Distribution File. In
the To field, type the full path and file name of an external distribution
file. The path and file name must be accessible to the ReportCaster
Distribution Server. For more information about external distribution files,
see Creating an External Distribution File.
-
Single Address. Specify
the printer using the following format
queue@printserver
where:
- queue
Is the name of the printer queue.
- printserver
Is the host name or IP address of the printer.
ReportCaster
can differentiate between the printer queue and the printer host name/IP
address due to the presence of the '@' separator. Information Builders recommends
specifying both the printer queue and host name/IP address when distributing
ReportCaster output to a printer. However, ReportCaster supports
specifying only the host name or IP address of the printer. The
maximum length of this field is 800 characters.
-
Dynamic Address. You
can select a dynamic address list by clicking the Choose
address
button.
The Select Dynamic Address Procedure dialog box opens.
Specify
the WebFOCUS Reporting Server Name, the Execution ID and password
for the server, and the procedure name that creates the dynamic
address list. For more information about dynamic address lists,
see Creating a Dynamic Distribution List.
Note: If the
printer you specify is unrecognized, the "Cannot connect to specified
printer" message will be recorded in the log file when the ReportCaster Distribution
Server tries to distribute the report.
-
Click
the Settings tab (see Specifying Optional and Notification Settings).
Distributing Scheduled Output to Managed Reporting
As a ReportCaster Administrator, you can schedule My Reports
and Standard Report for distribution to Managed Reporting.
Tip: Information Builders recommends distributing scheduled
output to the Report Library rather than to Managed Reporting. The
Report Library includes secure access to library content, the ability
to save multiple versions of the same output, and the ability to set
an expiration date or keep a specified number of versions.
When you select the Managed Reporting distribution method, the
report output is distributed to Managed Reporting as a Standard
Report or a My Report. The report is available to other users who
have access to the Domain where the report resides.
ReportCaster performs the following tasks
when you create a schedule to distribute output to the Managed Reporting
Repository:
- The WebFOCUS
Reporting Server communicates to Managed Reporting using the HTTP
protocol. The WebFOCUS Reporting Server sends a request to Managed Reporting
to create a Standard Reports or My Reports group folder containing
the report output.
- The output is stored differently depending
on where the report was scheduled:
- If the report
was scheduled in Standard Reports, ReportCaster creates a folder
in Standard Reports within the same Domain. The report output is
stored in the Domain /app directory.
- If the report
was created in My Reports, ReportCaster creates a folder in My Reports
within the same Domain. The report output is stored in the user's
directory in the Managed Reporting Repository. Since ReportCaster
does not distinguish subfolders, it distributes the reports to the
highest level folder regardless of the folder hierarchy within Managed
Reporting.
Note:
- Multiple
Managed Reporting reports are stored in the same folder if they both
run at the same time. We recommend assigning each Managed Reporting report
a different start time.
- ReportCaster
can be configured to distribute scheduled output to Managed Reporting
to a new folder each time the schedule runs, or to distribute the
output to the same folder each time it runs. If a new folder is
created each time the schedule runs, the folders will have a time
stamp to distinguish them. If a folder is reused each time the schedule
runs, each output in the folder will have a time stamp.
Procedure: How to Distribute Scheduled Output to Managed Reporting
-
In the
Distribution tab, select Managed Reporting from
the Distribute Reports by drop-down list.
The following image shows the Distribution
tab dialog box for Managed Reporting.
-
In the
Folder Name field, type the job description of the scheduled report.
This description must not exceed 90 characters.
This is will be the name of the folder(s) that contain
the output of the schedule when it runs.
-
Click
the Settings tab (see Specifying Optional and Notification Settings).
Reference: Considerations When Distributing Scheduled Output to Managed Reporting
When distributing scheduled output to
Managed Reporting, consider the following:
- The PostScript
(PS) format is not supported for this distribution method.
- When ReportCaster
is configured with a WebFOCUS Client on a z/OS UNIX Web server and
a WebFOCUS Reporting Server on z/OS, Managed Reporting distribution
is not supported for EXCEL or WK1 format. This limitation is due
to an EBCDIC to ASCII translation problem. This problem does not
occur when the WebFOCUS Client is installed on UNIX (AIX, HP‑UX,
Sun) or Windows platforms. Information Builders recommends using
the EXL2K format instead.
- When distributing
scheduled output to Managed Reporting with a format of COMMA, the
following information must be added to the /client76/wfs/etc/mime.wfs file
to open the output in Excel:
<ADDTYPE> .csv application/vnd.ms-excel binary yes yes no yes no
- When distributing
a report to Managed Reporting, you can drill-down to either a WebFOCUS
Server procedure or a Managed Reporting procedure.
To drill-down to a WebFOCUS Reporting
Server procedure or a Managed Reporting procedure, the original
procedure you are scheduling must include the following command:
SET FOCEXURL=http://hostname[:port]/wf_context_root/WFServlet;
where:
- hostname[:port]
Is the host name and optional port number of the Web/Application
Server on which the WebFOCUS Client is installed.
- wf_context_root
Is the site-customized context root for the WebFOCUS Web
application deployed on your Application Server. ibi_apps is the
default value.
The
following FEX shows the coding for a Managed Reporting procedure
using the FOCEXURL command.
-* FEX that is scheduled and distributed to the Report Library
-* Set FOCEXURL value for navigation back to WF Client and MR context
-* for execution of drill down request.  Must be coded using
-* concatenation of so that WF describe (auto prompting) is not invoked
-* and also for character encoding within URL to be done correctly.
-* Protocol, host and port to WF client.
-* Do not use localhost for the host value!
-SET &FOCEXURL='http://host:port';
-*
-* Call to WF Client.  /ibi_apps is the default URL context
-* but can be customized
-SET &FOCEXURL=&FOCEXURL | '/ibi_apps/WFServlet?IBIF_webapp=/ibi_apps' '&';
-* If report contains a drilldown the next set of lines are also needed.
-* Set WF Reporting Server to run request on
-SET &FOCEXURL=&FOCEXURL | 'IBIC_server=EDASERVE' | '&';
-*
-* Set whether the message viewer feature is ON or OFF.
-* When message viewer feature is ON the browser window displaying the
-* report will have multiple frames.  The top frame displays
-* the report and the bottom frame displays any messages returned
-* from the WF Server from the report execution.
-* Most often utilized during report development or to debug a problem.
-SET &FOCEXURL=&FOCEXURL | 'IBIWF_msgviewer=OFF' | '&';
-*
-* IBIMR_drill tells WF client subsequent request is a drill down
-* and the information after X, is the HREF of the MR domain
-* that the drill down FEX is located in.
-* In this example 'salesrpt' is the internal
-* domain directory and salesrpt.htm is the HTML file
-* containing the metadata information for the contents
-* within the salesrpt domain.
-SET &FOCEXURL=&FOCEXURL | 'IBIMR_drill=X,salesrpt/salesrpt.htm'| '&';
-*
-* SET environmental variable FOCEXURL
SET FOCEXURL='&FOCEXURL'
-*
TABLE FILE CAR
SUM CAR.BODY.SALES
BY CAR.ORIGIN.COUNTRY
BY CAR.COMP.CAR
BY CAR.CARREC.MODEL
ON TABLE SET STYLE *
TYPE=DATA, COLUMN=CAR.ORIGIN.COUNTRY,
 FOCEXEC=salesrpt/app/carmodel.fex,
 $
ENDSTYLE
ON TABLE SET HTMLCSS ON
ON TABLE NOTOTAL
END
The following is an example
of the drill down FEX that resides in Managed Reporting.
-* HTML Tool
-* Created by Report Assistant
-* FF Line do not change this line! Field Name
-* FF Line do not change this line! Alias
-* FF Line do not change this line! Format
-* FF Line do not change this line! Segment
-* FF Line do not change this line! displayTree=0
TABLE FILE CAR
SUM CAR.SPECS.MPG
CAR.SPECS.RPM
CAR.BODY.SEATS
BY CAR.COMP.CAR
BY CAR.CARREC.MODEL
BY CAR.BODY.BODYTYPE
ON TABLE SET HTMLCSS ON
ON TABLE NOTOTAL
END
-* End Report Assistant
- If you are distributing a large report
to Managed Reporting, take into consideration the amount of memory
configured on your Application Server. The report output returned to
Managed Reporting will be stored in memory by the WebFOCUS Client
(Servlet) and then written to the Managed Reporting Repository.
If there is not enough memory available on your Application Server,
the ReportCaster servlet trace file will contain the message “return
code not found. See your application server trace for information”.
The log report will include the message “Unable to distribute to
Managed Reporting: return code not found”. The problem can be resolved
by one or more of the following:
- Increase the
memory available on your Application Server.
- Modify your
report so that it returns a smaller report or less output.
- Limit the number
of scheduled jobs distributing to Managed Reporting during the same
time period.
Distributing Scheduled Output to the Report Library
When
you create a schedule, you can specify to distribute scheduled output
to the Report Library, a storage and retrieval facility. The Report
Library can contain any information that is distributed by ReportCaster.
When distributing to the Report Library, you can send an e-mail
informing users of its availability and the link to the content
in the library.
The Report Library includes secure access to library content,
the ability to save multiple versions of the same output, and the
ability to set an expiration date or keep a specified number of
versions. The Report Library is only available to ReportCaster users
who have been granted library privileges.
The Report Library stores items in categories that you create.
These categories allow you to organize scheduled output in the Library
for easy identification and tracking. When you choose the Report
Library distribution method, you must designate the category that you
want the scheduled output to be distributed to in the Category in
Library option found in the New Task dialog box. This is a required
field except when scheduling Managed Reporting tasks (Standard Reports
and My Reports), where there is a default category name using the
domain under which the report reside.
The Report Library consists of the Library Access List, Library
Content, and Library Management interfaces. For information on accessing
and using these interfaces, see Report Library.
Note: When a report is distributed to the Report Library,
the Log Report will include the report ID and the report version
number. This allows you to confirm which reports and report version
were distributed to the Library.
Procedure: How to Distribute Scheduled Output to the Report Library
-
In the
Distribution tab, select Library from the
Distribute Reports by drop-down list. The following Library options
appear.
-
Optionally,
select the Email for Library check box (Send
email after report saved to library) if you want to send an e-mail
message to users with access rights to the content in the Report
Library. Any user with access to this report will receive this e-mail
message, which contains the URL address needed to access the scheduled
output.
Note: You can limit to whom the Email for Library
option is available. For details, see Suppressing Library Distribution Options.
Select the Send email
after save report to library check box and then click Email
Options. The Email for Library window opens.
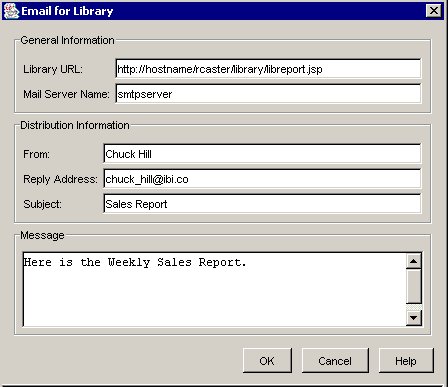
-
The only field that requires user input
is the Reply Address field. The Email for Library window contains
the following fields:
-
Library URL. The
URL that is needed to access the content in the Report Library.
By default, the Library URL is the URL specified during the ReportCaster
Distribution Server installation. This can be viewed in the Library tab
of the ReportCaster Server Configuration tool. If a notification
requires users to access the Report Library using a URL other than
the default URL, then specify that URL in this parameter.
If you
are on a Windows platform, do not specify localhost within the Library
URL. In such a case, when a user receives the URL it will point
to the user's own machine rather than the host name of the URL needed
to access the content in the library.
Note: If the
Library URL field is blank, then no report ID or burst values are
sent with the e-mail notification. To directly control whether or
not to send a report ID and burst values with an e‑mail notification,
see the Send Report ID and Version with Notification Email configuration
setting described in Report Library Settings.
-
Mail Server Name. The
SMTP e-mail server specified in the ReportCaster Server Configuration
tool. You can accept the default e-mail server, or type another
name for the e-mail server. ReportCaster requires the SMTP server domain
name, not its IP address.
-
From. This
can be any value (for example, the name of the person creating the
schedule). This is not required by ReportCaster, but may be required
by your e-mail system.
-
Reply Address. The
sender's e-mail address. If report recipients reply to the notification,
their messages will be sent to this address. If your e-mail system
is unable to deliver a report, the undelivered report message is
also returned to this address.
Note: If the Email Delivery,
Restrict Email Domains option is set to yes in the ReportCaster
server configuration tool, then only those e-mail domains (the portion
of the e-mail address following the at symbol) listed in Allowed
Email Domains (also in the server configuration tool) are valid
e-mail recipients.
-
Subject. The
optional text you want to display in the subject line of the e-mail
message. The default value is provided by the value in the Save
Report As field in the first Task you create, followed by a space
and then the word Report.
-
Message. The
optional e-mail message. You can overwrite the default message.
Note: When
a Managed Reporting report (Standard Report or My Report) is distributed
to the Report Library, and Public distribution is specified, the
library e-mail is sent only to the Managed Reporting users authorized
to access the Domain from which the report originated. For Access
List distribution, there is no filtering/validation done for the
library e-mail, as it is the responsibility of the Access List owner
to maintain the list so that it only includes authorized users.
Users who receive a library e-mail who are not authorized to view
the report as per Managed Reporting security cannot view the report
in the library.
Click OK to return
to the Distribution tab.
-
From
the Access Options drop-down list, select one of the following option
buttons to specify which users can view the report in the library.
Depending on what you previously specified, these users may also
receive an e-mail notification when the report is distributed to
the library.
Note: You
can limit the Access Options that appear on the Distribution tab.
For details, see Suppressing Library Distribution Options.
-
Optionally,
select the Limit distribution to values in Access List check
box. When you select this check box, only the burst values specified
in an Access List are distributed to the Report Library. This option
is used in combination with the Burst Report option (located on
the Tasks tab) and is only enabled when the Access List option is
selected. For more information, see Considerations When Limiting Distribution to Values in an Access List.
-
From the Expiration of Reports in Library
drop-down list, select one of the following option buttons:
-
Expire after. If you select this
option button, specify a number and then select one of the following
options:
version(s). The Report Library will store the
output for the top number of versions specified. For example, if
you specify 3 versions and the current version is 7, then versions
7, 6, and 5 are stored in the library. However, if you delete version
6, then only versions 7 and 5 are stored in the library. If you
then distribute version 8 to the library, only version 8 and 7 are
stored in the library since version 6 was deleted and version 5
is not among the top 3 versions.
day(s). The Report
Library will store the output for the number of day(s) specified.
week(s). The
Report Library will store the output for the number of week(s) specified.
month(s). The
Report Library will store the output for the number of month(s)
specified.
year(s). The Report Library will store the
output for the number of year(s) specified.
Note: ReportCaster
automatically purges expired output one hour after the Log Purge
Time. The default Log Purge Time is 1:00 A.M., therefore, the default library
purge time is 2:00 A.M. each day.
-
Never Expire. The
output will remain in the Report Library until it is manually deleted
by the owner or ReportCaster Administrator.
-
Optionally,
to conserve repository space, you can select the Compression check
box (Compress Stored Report) to compress files stored in the Report
Library. Compression is seamless to users viewing content in the
Report Library. However, ReportCaster Administrators can see which
files are compressed, and their compression ratios, in the Library
Management Interface. For more information, see Library Management.
ReportCaster Administrators can set compression on by default
using the Compression setting in the Library tab in the ReportCaster
Server Configuration tool (for more information, see ReportCaster Server Configuration). However, you can override the default setting
by selecting the Compression check box.
Note: If
you distribute a compressed report to the library, consider that this
may impact end user response time in viewing the report. A compressed
report must first be decompressed before it is sent to the user.
You should weigh the benefits of saving repository space against
the impact on end user report retrieval time from the library.
-
Click
the Settings tab (see Specifying Optional and Notification Settings).
Reference: Consideration When Drilling-Down to Another Report
When
distributing a report to the Report Library, you can only drill-down
to another report if it is a procedure on the WebFOCUS Reporting
Server. There is currently no support for drill-down functionality
to Managed Reporting procedures.
To
drill-down to a WebFOCUS Reporting Server procedure, the original
procedure you are scheduling must include the following command:
SET FOCEXURL=http://hostname[:port]/wf_context_root/WFServlet;
where:
- hostname[:port]
Is the host name and optional port number of the Web/Application
Server on which the WebFOCUS Client is installed.
- wf_context_root
Is the site-customized context root for the WebFOCUS Web
application deployed on your Application Server. ibi_apps is the
default value.
Reference: Changing the Burst Option When Distributing to the Library
Enabling or disabling the burst option
in a schedule being distributed to the library is not recommended
because burst and non-burst reports display differently in the library.
Rather than editing your schedule and changing this option, Information
Builders recommends creating a new schedule as follows:
- Clone your
existing library schedule (see Maintaining a Schedule)
and specify a unique name for the new schedule job description.
- Edit the new schedule as follows:
- Select the Enabled check
box to activate the schedule.
- Enable or disable
the burst option as needed.
- Click OK to
save the schedule.
- Optionally,
delete the original schedule if it is no longer needed and evaluate whether
you need the existing content in the library.
Note:
- When ReportCaster
distributes the new schedule content to the library, a new folder
is created for the library content. To delete the original folder
in the library, you must delete all versions of the report within
the folder.
- If you disable the burst option for
a burst schedule and you do not delete the schedule's content in
the library before making the change, the subsequent output will appear
in a separate folder with the same report name as the burst report
folder. The version numbering in the new folder picks up where the
burst value versions ended. Version numbers will continue sequencing
between burst and non-burst reports each time you enable and disable
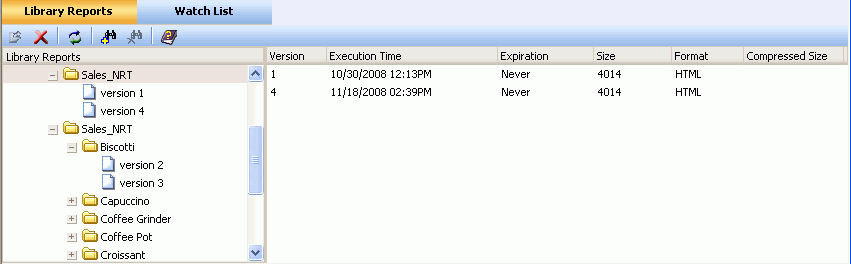
bursting. The following image shows an example of burst and non-burst
versions of the same report in the Report Library.
Reference: Considerations When Limiting Distribution to Values in an Access List
When limiting Report Library distribution
to values in an Access List, note the following:
- All other burst
values not specified in the Access List are not distributed to the
library.
- This option
does not alter the running of the procedure or the retrieval of
records from the data source, but simply filters the burst report
sections returned from the WebFOCUS Reporting Server based on the
burst values specified in the Access List.
- When the Burst
Report option is enabled and the Limit distribution
to values in Access List option is not enabled, ReportCaster
continues to distribute all burst report sections returned by the WebFOCUS
Reporting Server to the Report Library.
- Upon saving
the schedule, validation is performed to confirm that the schedule
has the Burst Report option enabled. If it
has not been selected, a message appears reminding you that you
must enable the Burst Report option to limit
distribution to values specified in an Access List, and the schedule
options are redisplayed.
- The log file
contains information specifying that the Limit distribution
to values in Access List option was selected. A separate
log entry appears for each Access List burst value specifying whether
a report section for that burst value was distributed to the library.
 icon
and then select the users or groups from the User List.
icon
and then select the users or groups from the User List.