WebFOCUS
Online Help > ReportCaster Development and Administration > Creating and Maintaining a List of Multiple Recipients > Creating a Distribution List
Creating a Distribution List
When
you create a Distribution List, you specify public or private access
and optional burst values for reports. For more information about
bursting, see Bursting a Report. Additionally, you must specify one of the following
distribution methods:
Procedure: How to Create an E-mail Distribution List
-
From
the ReportCaster - Address Book Management window, select the Create
a New Distribution List
 icon,
or select New from the Action menu.
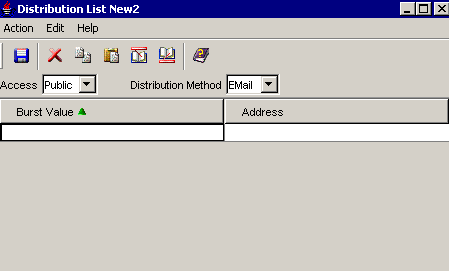
The Distribution List New window opens, as shown in the
following image.
Note: If
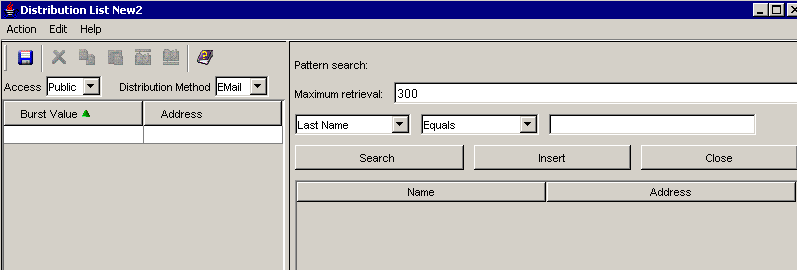
the Email LDAP Enabled parameter is set to YES in the ReportCaster
Server Configuration tool, the Distribution List New window opens
with the toolbar options and Distribution List fields in the left
pane, and the Address Search fields in the right pane, as shown
in the following image.
If you will not be
retrieving e-mail addresses defined in an LDAP data source, you can
click Close to close the Address Search pane
and increase the display size of the Distribution List fields. To
reopen the Address Search pane, click the Address Search  icon.
icon.
-
From
the Access drop-down list, select Public or Private.
Only the owner and ReportCaster Administrators can view a Private
Distribution List, whereas every ReportCaster user can view a Public Distribution
List.
Note: The values in the Access drop-down list are
dependent on your ReportCaster configuration.
-
From
the Distribution Method drop-down list, select EMail.
Email is the default value.
-
In the
Burst Value field, if you are bursting a report (WF Server Procedure,
Managed Reporting Standard Report, or Managed Reporting My Report), specify
individual sort values in the field. This value is case sensitive,
can be a maximum of 75 characters, and, when used with keywords,
can contain wild cards or Java regular expressions. For details
on using wildcards and Java regular expressions in burst values,
see Bursting Guidelines and Limitations When Creating a Task.
The burst value for a tabular report will be the first
BY field, which is the primary sort field. The burst value for a
graph report will be the second BY field. The burst value specified
must exist in the data source that the scheduled job reports against.
For
more information about bursting a report, see Bursting a Report.
-
In the
Address field, specify the e-mail addresses of the recipients (for example,
chuck_hill@ibi.com). Be careful typing this information because
there is no edit checking. The maximum number of e-mail addresses
you can specify in a Distribution List is 9999. You can specify
a maximum of 800 characters within a single Address line.
Note:
- If the Email
Delivery, Restrict Email Domains option is set to yes in the ReportCaster
server configuration tool, then only those e-mail domains (the portion of
the e-mail address following the at symbol) listed in Allowed Email
Domains (also in the ReportCaster Server Configuration tool) are
valid e-mail recipients.
- Placing your
cursor in one of the Burst Value or Address fields activates the toolbar
icons. For more information about how to use these icons, see Step
4 in Editing a Distribution List.
- You can specify
multiple e-mail addresses within a single Address field. For more
information, see Specifying Multiple E-mail Addresses.
- You can retrieve
e-mail addresses defined in an LDAP data source. For more details,
see How to Retrieve E-mail Addresses for a Distribution List Using Address Search.
-
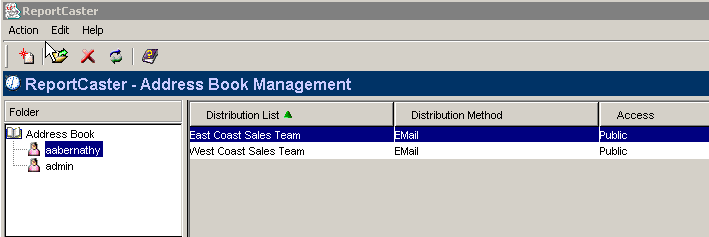
Click Save and
specify a name for your Distribution List. The Distribution List
appears in the Address Book with the name you specified. For example,
the following image shows the East Coast Sales Team Distribution
List in the Address Book Management window.
Procedure: How to Retrieve E-mail Addresses for a Distribution List Using Address Search
Note: The
Address Search pane only appears if the Email LDAP Enabled parameter
is set to YES in the ReportCaster Server Configuration tool. For
more information, see LDAP Settings.
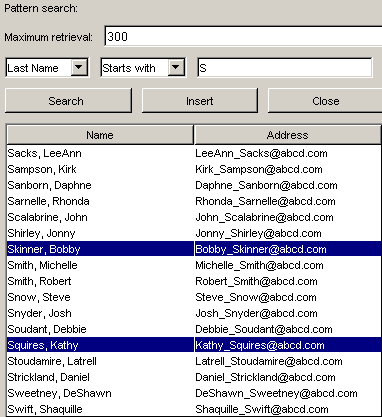
The following image shows the Address
Search pane that appears to the right of the Distribution List pane
while creating or editing a Distribution List.

-
Select
the search criteria and type the search string. You can search using
the following combinations:
-
Last Name [Equals |
Starts with | Ends with | Contains]
- First Name
[Equals | Starts with | Ends with | Contains]
- Email [Equals |
Starts with | Ends with | Contains]
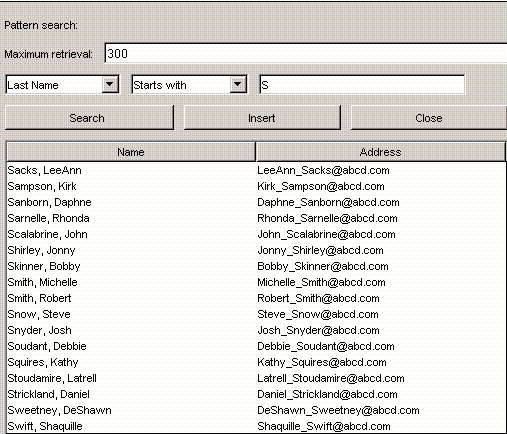
For example, if
you type S after the Last Name Starts with field, ReportCaster retrieves
last names that start with the letter S.

-
Optionally,
you can change the Maximum retrieval value.
By default, ReportCaster retrieves a maximum of 300 e-mail
addresses. You can change this default value for the duration of
your session. However, if you log out and log back in, the Address
Search window displays the default value of 300. ReportCaster allows
the retrieval of a maximum of 500 e-mail addresses. If you suspect
your search will return more than 500 records, you should refine
your search criteria.
-
Click Search.
ReportCaster retrieves the specified names from the LDAP data source.
-
Select
the e-mail address(es) you want to use in your Distribution List. You
can multi-select e-mail addresses by pressing the Ctrl key or the
Shift key.
-
Click Insert to
insert the e-mail address(es) into your Distribution List, as shown
in the following image.
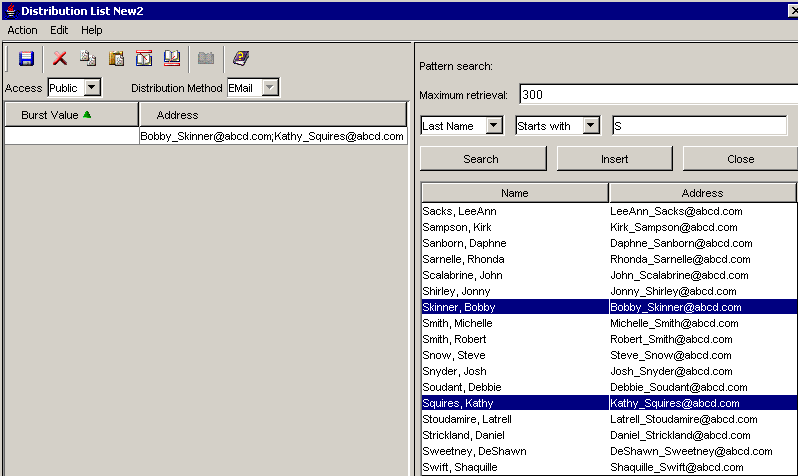
By
default, ReportCaster separates multiple e-mail addresses with a
comma. The e-mail addresses will appear in the To line of a single
e-mail when the scheduled output is distributed.
Note: Repeat
these steps if you want to change your search criteria or insert
additional e‑mail addresses into your schedule. If you insert additional
e‑mail addresses while the original e-mail addresses are selected,
the new e-mail addresses will replace the old ones. If your cursor
is positioned after the original e‑mail addresses, the new e‑mail
addresses are appended to the old ones, separated by a comma. However,
be aware that the maximum number of characters is 800 when inserting
addresses.
Procedure: How to Create an FTP Distribution List
-
From
the ReportCaster - Address Book Management window, select the Create
a New Distribution List
 icon,
or select New from the Action menu.
The Distribution List New window opens.
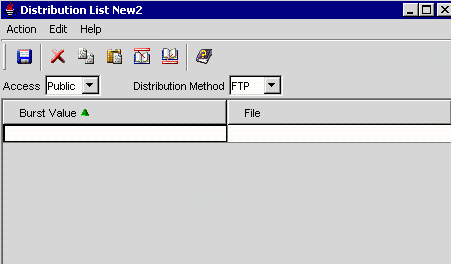
Note: If
ReportCaster is Email LDAP Enabled, the Address Search fields appear
in the right pane but are grayed out when you select the FTP Distribution
Method.
-
From
the Access drop-down list, select Public (default)
or Private. Only the owner and ReportCaster Administrators
can view a Private Distribution List, whereas every ReportCaster
user can view a Public Distribution List.
Note: The values in the Access drop-down list are
dependent on your ReportCaster configuration.
-
From
the Distribution Method drop-down list, select FTP.
-
In the
Burst Value field, if you are bursting a report (WF Server Procedure,
Managed Reporting Standard Report, or Managed Reporting My Report), specify
individual sort values in the field. This value is case sensitive,
can be a maximum of 75 characters, and, when used with keywords,
can contain wild cards or Java regular expressions.
The burst value for a tabular report will be the first
BY field, which is the primary sort field. The burst value for a
graph report will be the second BY field. The burst value specified
must exist in the data source that the scheduled job reports against.
For
more information about bursting a report, see Bursting a Report and Bursting Guidelines and Limitations When Creating a Task.
-
In the
File field, specify the names of the FTP files that will hold the report
(including the extension). The extension specified here should be
appropriate for the format selected when creating the schedule.
For example, if you selected Excel or EXL2K on a Windows platform,
the file should be drive:\directory\filename.xls. The maximum
number of FTP files you can specify in a Distribution List is 9999.
Note: Placing your cursor in one of the Burst Value
or File fields activates the toolbar icons. For more information
about how to use these icons, see Step 4 in Editing a Distribution List.
-
Click Save and
specify a name for your Distribution List. The Distribution List
appears in the Address Book with the name you specified, for example,
East Coast Sales Team, as shown in the following image.

Note:
- When using FTP
to transfer Cascading Style Sheet (CSS) files from any platform
to z/OS UNIX and the z/OS UNIX httpd.conf file contains the default
MIME type of 8-bit for CSS files, then the CSS files must be in
transferred in binary mode.
- For more information
about considerations you should be aware of when creating burst
values for an FTP Distribution List, see Considerations When Distributing a Burst Report Using FTP.
Procedure: How to Create a Printer Distribution List
Before
creating a Distribution List, we recommend verifying that you can
connect to your printer by test printing a document outside of ReportCaster.
-
From
the ReportCaster - Address Book Management window, select the Create
a New Distribution List
 icon,
or select New from the Action menu.
The Distribution List New window opens.
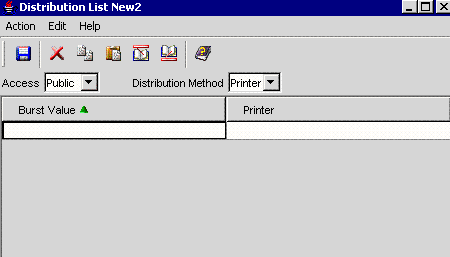
Note: If
ReportCaster is Email LDAP Enabled, the Address Search fields appear
in the right pane but are grayed out when you select the Printer
Distribution Method.
-
From
the Access drop-down list, select Public (default)
or Private. Only the owner and ReportCaster Administrators
can view a Private Distribution List, whereas every ReportCaster
user can view a Public Distribution List.
-
From
the Distribution Method drop-down list, select Printer.
-
In the
Burst Value field, if you are bursting a report (WF Server Procedure,
Managed Reporting Standard Report, or Managed Reporting My Report), specify
individual sort values. This value is case sensitive, can be a maximum
of 75 characters, and, when used with keywords, can contain wild
cards or Java regular expressions.
The burst value for a tabular report is the first BY field,
which is the primary sort field. The burst value for a graph report
is the second BY field. The burst value specified must exist in
the data source that the scheduled job reports against.
For
more information about bursting a report, see Bursting a Report and Bursting Guidelines and Limitations When Creating a Task.
-
In the
Printer input field, specify the printer using the following format
queue@printserver
where:
- queue
Is the name of the printer queue.
- printserver
Is the host name or IP address of the printer.
Although
ReportCaster supports specifying only the print server (host name
or IP address), we recommend that you specify both the print queue
and print server. (ReportCaster differentiates between the printer
queue and the printer server by detecting the presence of the '@'
separator.)
Note: Placing your cursor in one of the
Burst Value or Printer fields activates the toolbar icons. For more
information about how to use these icons, see Step 4 in Editing a Distribution List.
-
Click Save and
specify a name for your Distribution List. The Distribution List
appears in the Address Book with the name you specified. The following
image shows an Address Books named East Coast Sales Team and West
Coast Sales Team.

Reference: Considerations When Creating a Printer Distribution List
When
printing on Windows and UNIX, ReportCaster uses the line printer
(lp) protocol, which runs on top of TCP/IP to communicate with printers.
lp printing with the Novell Client is not supported. For printing
on z/OS, ReportCaster uses the line printer remote (lpr) UNIX command,
which has special options on the mainframe for sysout dest and class.
When
creating a printer Distribution List on z/OS, the printer should
be a SYSOUT class (such as A) that has been routed to a printer.
For example, you can indicate that scheduled report output be distributed
to a specific network printer by typing the following printer identification
A DEST printserver
where:
- A
Is the SYSOUT class to be assigned to a network printer.
- printserver
Is the printer host name (for example, IBVM.P24E2).
 icon,
or select New from the Action menu.
 icon.
icon.


