To move ReportCaster data to another ReportCaster Repository:
- Log onto ReportCaster in the target environment (the environment that will receive the data).
-
Access the Change Management interface using one of
the following methods:
- Click Change Mgmt in the ReportCaster HTML interface
- Click Change Management in the ReportCaster Development and Administration interface of the applet
- Click the Change Management icon located in the toolbar
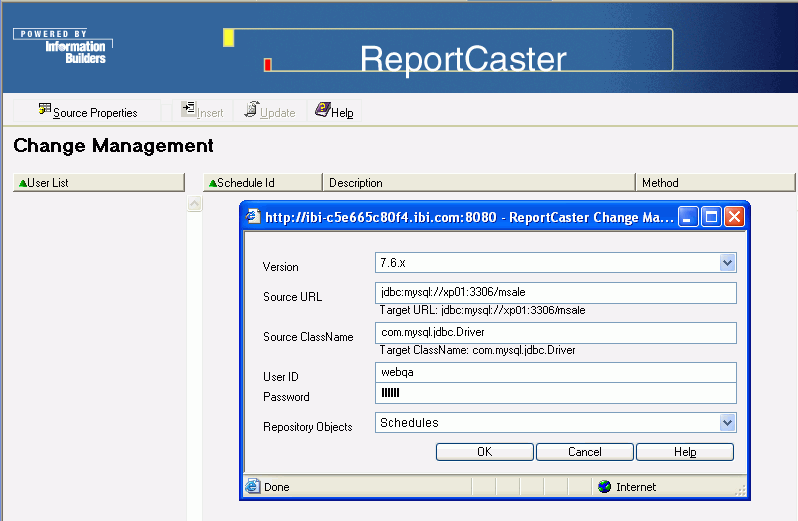
The Change Management user interface opens along with the Source Properties window, as shown in the following image.
The Change Management Source Properties window displays the information needed to connect to the source ReportCaster Repository. When you access Change Management for the first time, you must set the source Repository properties. For instructions on setting or changing the source connection information, see Setting the Connection Properties.
-
From the Repository Object drop-down
list, select the type of data you want to move. The selections are:
- Schedules
- Distribution Lists
- Access Lists
-
Click OK.
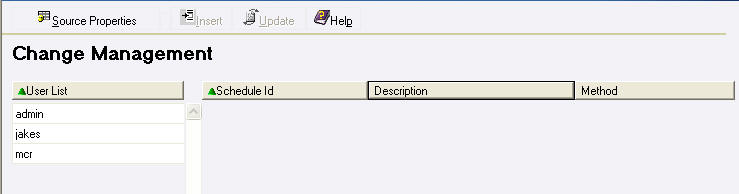
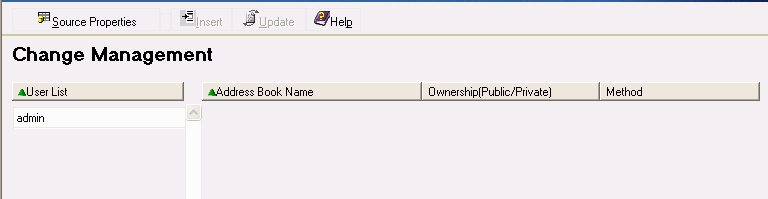
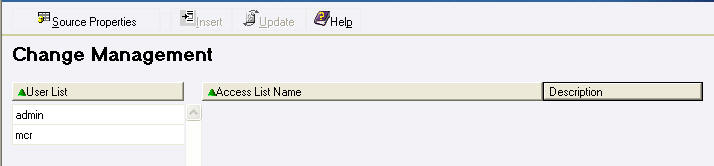
The ReportCaster interface displays a list of users found in the source repository, as well as a series of headings related to the type of Repository object you selected.
The following image shows the Change Management interface when you select Schedules as the Repository Object.
The following image shows the Change Management interface when you select Distribution Lists as the Repository Object.
The following image shows the Change Management interface when you select Access List as the Repository Object.
-
In the left pane, select a user whose repository data you want
to move.
Note: You can select only one user for each transfer of data.
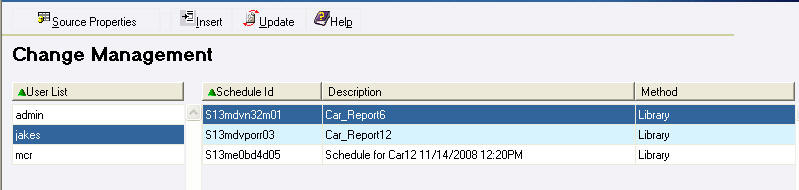
The right pane displays the related repository objects owned by the selected user. The following image is an example of a list of schedules for a specific user.
- Select the items you want to move to the target repository. (Select multiple items using the Shift and Ctrl keys.)
-
Click one of the following:
- Insert - to add the selected source records to the target repository if that record does not already exists.
- Update - to add the selected source records to the target repository and overwrites any corresponding records that exist in the target repository.
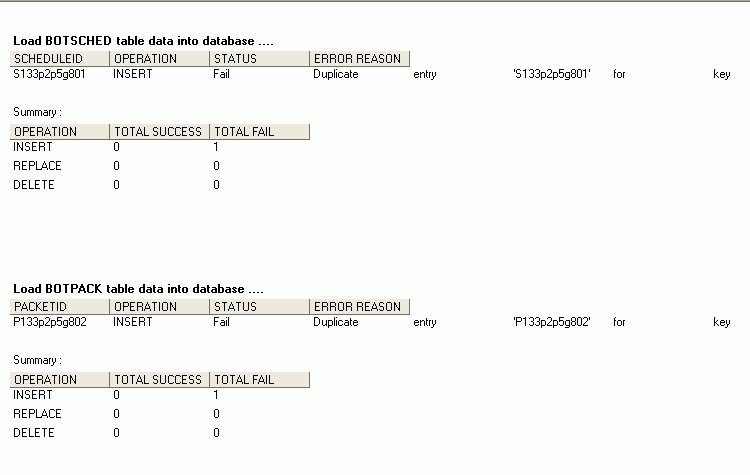
Note: Duplicate records cannot exist in the ReportCaster Repository.
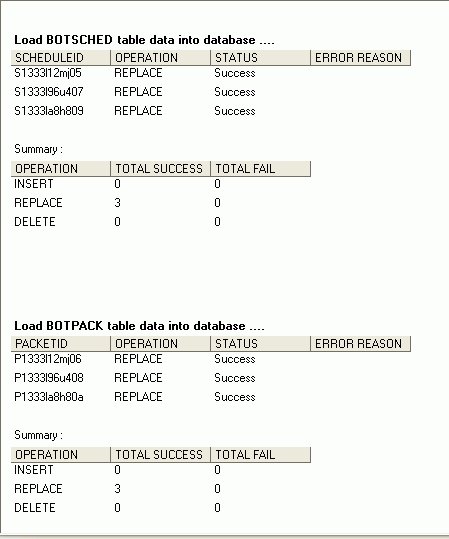
A window opens and displays the status of and summary of operations on each repository table that was involved in the data transfer. The information includes the operation (insert or update), whether or not the operation was successful, and if it failed, a brief explanation. See Change Management Logs for examples of this window.
This information is saved in a log file (changemgmt.log) on the Distribution Server in ibi\ReportCaster76\log. A new log is created each time you click Insert or Update, so the latest log file is time stamped and renamed with a .bak file extension.
- If you want to save the log to a location other than the log directory, select Save As from the File menu in the browser window.
- To continue transferring the selected Repository object for another user, select a user in the left pane. If you want to transfer a different Repository object, click Source Properties in the Change Management interface toolbar to open the Source Properties window, and follow Steps 3 through 8.