WebFOCUS
Online Help > ReportCaster Development and Administration > Accessing ReportCaster and Enabling User Capabilities > Enabling ReportCaster Capabilities for Non-Managed Reporting Users
Enabling ReportCaster Capabilities for Non-Managed Reporting Users
To
enable ReportCaster capabilities for non-Managed Reporting users,
you must be a ReportCaster Administrator. Non-Managed Reporting
users must be enabled for ReportCaster using the User Administrator
tool in the ReportCaster Development and Administration Interface.
Note that user passwords can be validated externally. For more information,
see Configuring ReportCaster With External Authentication.
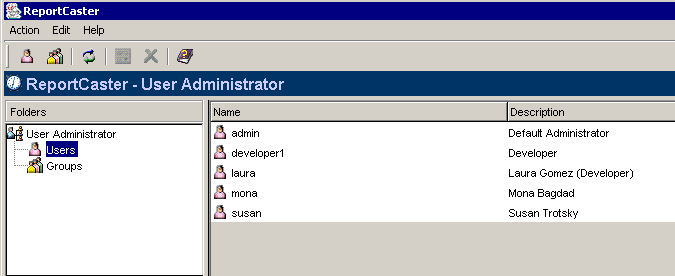
To access the User Administrator tool, click the User Administrator link
from the ReportCaster Development and Administration Interface.
The ReportCaster - User Administrator window opens, as shown in
the following image.
Within the User Administrator tool, you can perform the following
administrative tasks:
Procedure: How to Create a New User
To create a new user:
-
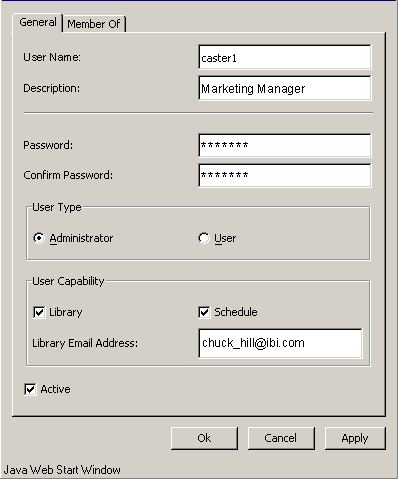
Click
the Create a New User icon, or select New
User from the Action menu.
The New User window opens, as
shown in the following image.
-
In the
User Name field, type the user ID. This is the owner ID for all schedules
created by this user.
-
In the
Description field, type a description for the user.
-
In the
Password field, type the password for the user ID.
-
In the
Confirm Password field, retype the password.
-
In the
User Type section, specify whether or not the user is a ReportCaster
Administrator. A ReportCaster Administrator is required to have
the Schedule privilege.
-
In the
User Capability section, you can select the Library and
Schedule check boxes.
The Library check box enables the user to view content
in the Report Library to which they have been granted access. If
the user is a ReportCaster Administrator, they can manage content
in the Report Library. The user becomes a member of the public library
directory and can be added to Library Access Lists.
The Schedule
check box enables the user to schedule WF Server Procedures, the contents
of URLs, and files.
Note: ReportCaster Administrators
can create and save a new user without selecting the Schedule check
box provided that the new user is not a ReportCaster Administrator.
-
Type
the user's e-mail address. The e-mail address is required for the Report
Library.
-
Specify
whether the user ID is Active (the default) or Inactive. To make the
user ID inactive, uncheck the Active check box.
-
Click OK to
save the changes to the ReportCaster Repository tables.
Procedure: How to Create a New Group and Add Users to the Group
Similar
to creating a Distribution List, you can group users together to
access information in the Report Library that is relevant to that
group of users. Once a group has been created, it can be added to
an Access List that specifies which groups and users can view scheduled output
sent to the Report Library. For more information about Access Lists
and the Report Library, see Report Library.
-
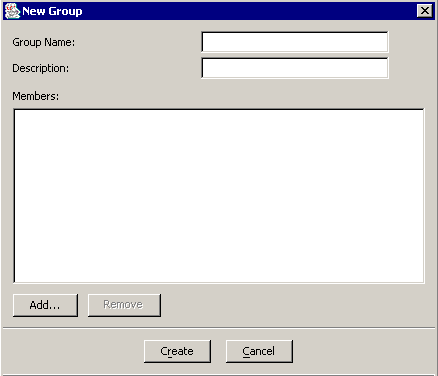
Click
the Create a New Group icon, or select New
Group from the Action menu. The New Group window opens,
as shown in the following image.
-
In the
Group Name field, type the name of the group.
-
In the
Description field, type a description of the group.
-
To add
users to the group, click Add. The Select
Users window opens.
-
Select
the users you want to add to the group.
-
Click Create.
Procedure: How to Edit the Properties of a User or Group
To
edit the properties of a user or group:
-
In the
Folders pane on the left side of the ReportCaster - User Management
window, select Users or Groups. Depending
on your selection, all users or all groups display in the right
pane of the ReportCaster - User Management window.
-
Perform
one of the following:
- Right-click
the user or group whose properties you want to change, and select Properties.
- Select the
user or group whose properties you want to change, and click the Properties
 icon
from the toolbar.
icon
from the toolbar.
- Double-click
the selected user or group whose properties you want to change.
The
Properties window opens.
-
If you
are editing the properties of a user, make the necessary changes to
the General tab. You can also click the Member Of tab
to add or remove the user from a group.
If you are editing the properties of a group, you can change
the description of the group, and add or remove users from the group.
-
Once
you have completed editing the properties of the user or group, click OK to
save the changes to the ReportCaster Repository tables and exit
the Properties window, or click Apply to
save the changes to the ReportCaster Repository tables and remain
in the Properties window for additional editing.
Procedure: How to Delete a User or Group
To delete a user or group:
-
In the
Folders frame in the left pane of the ReportCaster - User Management
window, select Users or Groups.
Depending on your selection, all users or all groups display in
the right frame of the ReportCaster - User Management window.
-
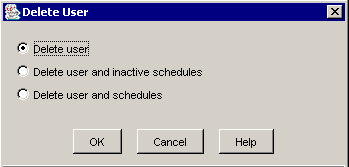
Select
the user or group that you want to delete and then click the Delete icon
(which displays as an X). You can also right-click the user or group
and then select Delete from the drop-down menu.
The Delete User window opens, as shown in the following
image.
-
Select
the applicable option button and then click OK to
save the changes to the ReportCaster Repository tables.
Tip: If
you delete a user ID, you can use the Tools option in the ReportCaster
Console to globally replace the user ID in schedules, Distribution
Lists, and Library Access Lists that contain the deleted user ID.
For more information, see Globally Replacing Field Values in the ReportCaster Repository.