Viewing the Status of an Executed Job
The Job Log displays information about the activities that occurred during the execution and distribution of a report. The Job Log enables you to confirm that a report was executed and distributed successfully. If a job does not execute as expected, the Job Log displays explanatory information.
The following image is a sample entry from a Job Log.
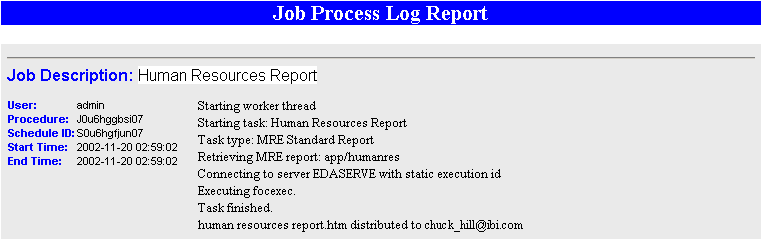
It includes the following:
- Two-Way Email Job Description. The name of the template associated with the job.
- Server User. The WebFOCUS Reporting Server user ID.
- Managed Reporting User. The Managed Reporting user ID.
- Process. A unique, system-generated key that identifies a specific execution of the template.
- Job Name. The name of the Managed Reporting Standard Report procedure, preceded by app and the forward slash delimiter (/).
- Start Time. The date and time the job started running.
- End Time. The date and time the job finished running.
- Messages. Details on the activities that took place during job execution and distribution.
Procedure: How to View the Status of an Executed Job
-
Select Two-Way
Email on the Managed Reporting browser blue toolbar
to access the Two-Way Email Administrator console. In the Developer
Studio Explorer, click the Two-Way Email Administrator
 button in the toolbar.
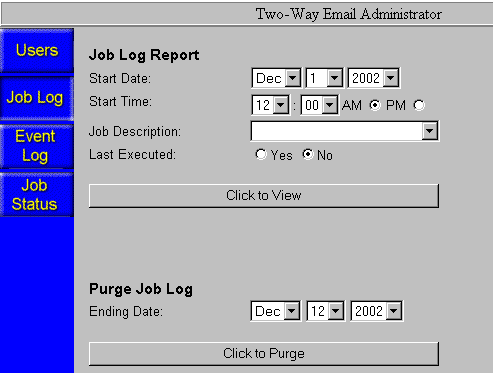
- Click the Job Log button on the left to display the Job Log Report interface as shown in the following image.
-
Apply selection criteria to define
the information that will be retrieved:
- Use the drop-down lists for Start Date and Start Time to specify the beginning of the time frame. Information on all jobs run from that date and time up to the current date and time will be retrieved.
- Type the name of a specific Two-Way Email template in the Job Description field. Information for only the jobs associated with that template during the specified time frame will be retrieved.
- Select the option Yes for Last Executed. Information for only the most recently executed job associated with the template (Job Description) during the specified time frame will be retrieved.
- Click the Click to View button to display the Job Log report.