In this procedure, you will add and style a page heading and page footing. The procedure uses sample values, but you can supply values that apply to your own charts.
This feature is available in Query Design view, Interactive Design view, and Compose view.
- With your chart open, click the Head/Foot button in the Report group of the Home tab. The Heading & Footing dialog box opens.
-
Click the
tab for the page heading or page footing, depending on which you
want to add.
By default, the Page Heading tab is selected. In this procedure,
accept the default to add a page heading first.
Tip: Another way to access the Heading & Footing dialog box is to click the arrow next to the Head/Foot button. It opens a drop-down menu from which you can select the heading or footing that you want to work with. After you make your selection, the Heading & Footing dialog box opens, and the heading or footing that you selected is active.
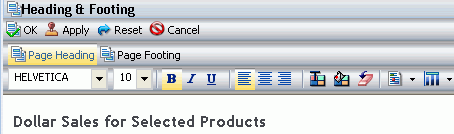
- Click inside the design area of the dialog box, and type the text for the page heading. For example, the text for a sample page heading might be Dollar Sales for Selected Products.
-
Using the
styling options, apply styling to the page heading text.
For example, click the arrow next to the font type field, and click HELVETICA. Click 10 for the font size. Click the Left justification icon to align the page heading on the left when the chart is run.
A sample page heading with the selected styling values is shown in the following image.
- Click Apply to save the changes that you have made so far, without closing the dialog box.
- To add a page footing, click the Page Footing tab. In this procedure, you are going to add one of the supplied quick text options, followed by some text of your own.
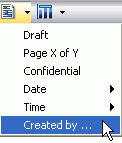
- Click the down arrow next to the preformatted text icon, and click Created by from the drop-down list, as shown in the following image.
- Complete the text by typing the applicable value within the supplied text, for example, Created By Sales Manager.
- Change the styling as desired.
- Click OK to save the page heading and page footing and close the Heading & Footing dialog box.
- Run the query. The chart contains the page heading and page footing that you added and styled, as shown in the following image.
- To make changes to either the page heading or page footing, return to design view. Right-click the heading or footing, and click Edit from the drop-down menu.