- Click the Data selection tab.
- Click the Join tab, located to the right of the Available Fields tab.
-
Click
the Join
 button.
The Please pick a target master file dialog box opens.
-
Select a Master File and click OK.
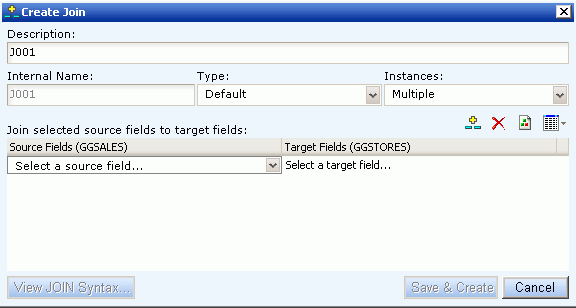
The Create Join dialog box opens, as shown in the following image.
- In the Description box, give the join a meaningful and unique name.
-
Select
one of the following join Type options:
- Default. For an existing join. Utilizes the existing join type.
- Inner. An Inner join omits the source file rows that lack corresponding rows in the target file.
- Left Outer. A Left Outer join extends the results of an Inner Join and retrieves records from both the source and target files. This type of join includes all records from the source file and any records from the target file where the condition values match. If there are no matching values in the target file, the join still retrieves records from the source file.
-
Select one of the following join Instances
options:
-
Multiple. A Multiple Instances
join is a one-to-many join structure that matches one value in the
source file to multiple values in the target file.
For example, joining the employee ID field in an employee data source to the employee ID field in a company training data source that lists all training classes offered to employees would result in a listing of all courses taken by each employee, or a joining of the one instance of each ID in the source file to the multiple instances of that ID in the target file.
-
Single. A Single Instance join
is a one-to-one join structure that matches one value in the source
file to one value in the target file.
For example, joining the employee ID field in an employee data source to an employee ID field in a salary data source would result in a single instance of salary data for each employee ID.
-
Multiple. A Multiple Instances
join is a one-to-many join structure that matches one value in the
source file to multiple values in the target file.
-
Select
an appropriate indexed field from the source file using the Select
a source field drop-down list below the Source Fields heading. You
can also select multiple indexed fields from the source file when
creating a multi-fields join.
Note: Fields from the source and target files must have the same format and be indexed fields in order to use them to create joins. Indexed fields are identified by the key
 icon.
icon. -
Select
an appropriate indexed field from the target file using the Select
a target field drop-down list below the Target Fields heading.
Note: If you selected a field from the source file that does not have a matching indexed field with the same format in the target file, the message 'There were no fields found" is displayed instead of a Target Fields drop-down list.
- To see the join syntax, click the View JOIN Syntax button, then click OK.
-
Click
the Save & Create button to create the
join.
The new join appears in the Joins list.