The Join tool provides a graphical method for creating and manipulating Joins. You must specify a host file, then a cross-referenced file to create a join.
You create the Join as an object, separate from any other object or procedure. You are responsible for placing the Join object in the correct position within your procedure (that is, before a Define, Report, or Graph), and for running it. The Join remains active for the entire session, unless you explicitly clear it.
You can open the Join tool from either the toolbar or from a reporting tool. Before the tool opens you will be asked to select a host file.
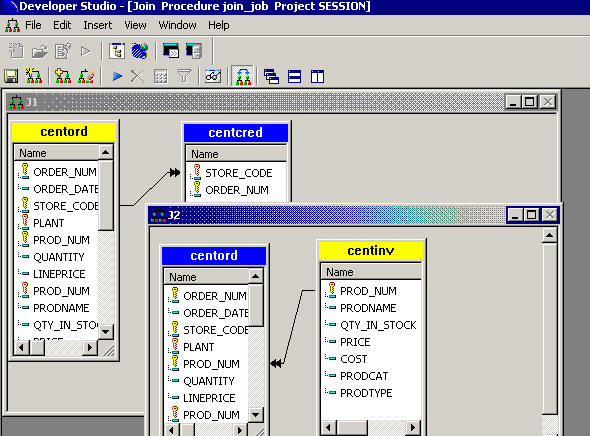
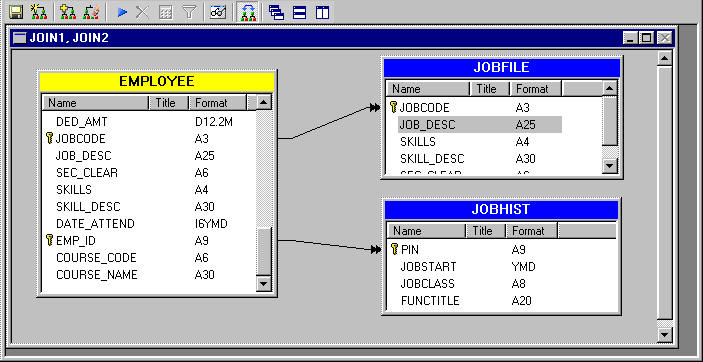
The Join tool displays both files and, ordinarily, a default Join:
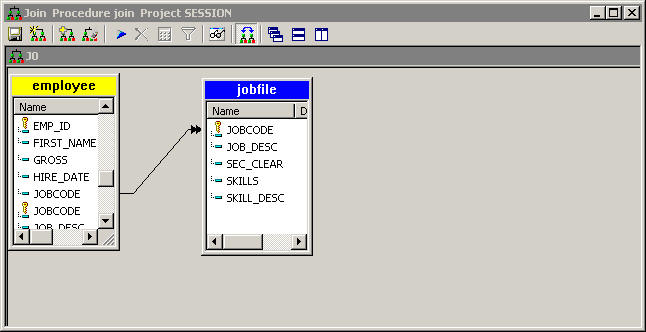
- A Join is represented by a connector line from the host Join field to the cross-referenced Join field. A single arrow indicates a single instance Join; a double arrow indicates a multiple instance Join, the default Join type.
- Developer Studio automatically creates a Join between the files if they both have fields with the same formats (and, for a FOCUS file, if the cross-referenced field is indexed). You can use the Toggle Auto Join feature to perform automatic joins within tables. You can use the default Join as it is, or you can customize the Join. If multiple fields have the appropriate format, the default Join is not created unless one of these fields has the same name as the host field. In this case you must specify a join explicitly.
- A host file is indicated by a yellow caption. A cross-referenced file is indicated by a blue caption.
- Indexed fields
have a key icon
 in front of the field, and virtual
fields have a define icon
in front of the field, and virtual
fields have a define icon  in
front of the field. A virtual field is a temporary field that does not
actually exist in the data source; its value is computed based on
an expression you write. After it is created, the virtual field
is treated as if it were a field in the data source.
in
front of the field. A virtual field is a temporary field that does not
actually exist in the data source; its value is computed based on
an expression you write. After it is created, the virtual field
is treated as if it were a field in the data source. - By default, the list of field names in each data source displays in the Join window. You can change the display to show the following additional information about each field, if it is available in the Master File: alias, format, title, and description.
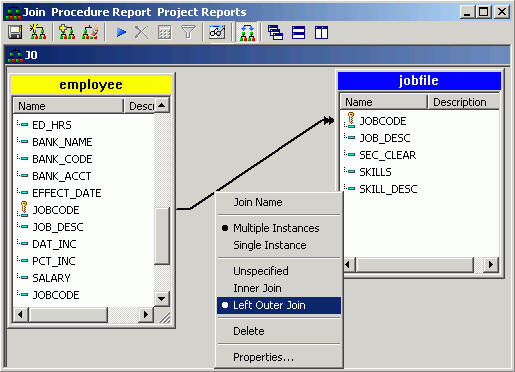
Note: The syntax identifies if the join is an inner, left outer, unique, or non-unique join. When you open a join in the Join tool that was created prior to Version 7, Release 1 you need to specify the join type. For details on specifying the join type (join properties), see the documentation related to the Join Properties dialog box.
When you access the Join tool a toolbar opens below the title bar. You can access the following commands from the toolbar:
|
Button |
Command |
Description |
|---|---|---|
|
Save |
Saves the join.
| |
|
New Join |
Creates additional concurrent joins. Note: You may also select New Join from the right-click context menu in the Join window.
| |
|
Add File |
Selects a cross-referenced file to join to the host file you have already selected. Note: You may also select Add File from the right-click context menu in the Join window.
| |
|
Clear Join |
Launches the Join Clear window. Note: You may also select Clear Join from the right-click context menu in the Join window.
| |
|
Run Join |
Runs a join to check syntax. Note: You may also select Run from the right-click context menu in the Join window.
| |
|
Delete |
Deletes a selected object (table or join). | |
|
Define Field |
Launches the Join Define in File dialog box to create a virtual field in the host file. | |
|
|
Create/Edit Selection |
Launches the WHERE Expression Builder to create WHERE criteria and change the join type to a conditional join. This is enabled only when the host table is selected. |
|
Show/Hide Source Code |
Shows or hides the FOCUS code generated by the Join tool. This is enabled only when the Join link is selected. | |
|
Toggle Auto Join |
Performs automatic joins within tables. | |
|
Cascade |
Creates a cascade view of multiple joins (default). | |
|
Horizontal Tile |
Splits the Join tool horizontally when working with multiple joins. | |
|
Vertical Tile |
Splits the Join tool vertically when working with multiple joins. |


If you want to define a Join in a procedure:
-
Right-click
the procedure in the Procedures folder and
choose Edit in Developer Studio Tool from
the context menu.
The Procedure Viewer opens.
- Click the component connector (yellow diamond) at the point where you want to include the join in the procedure, then click the Join button on the component connector toolbar.
-
Choose
a Master File for the data source you wish to use as your host file
and click Open.
The Join tool opens showing a Fields window for the host file that you selected.
-
To add
a cross-referenced data source to the Join, click the Add
File button on the Join toolbar or choose File from
the Developer Studio Insert menu.
Tip: You may also right-click anywhere in the Join window and select Add File from the context menu.
- Select a cross-referenced file.
-
Click OK.
A default Join is created if the host and cross-referenced files share appropriate fields. If a default Join is not created, follow the instructions in Customizing a Join to create your own.
Note: This procedure applies to creating a Join in the Managed Reporting environment.
-
In the Reporting Object window, double-click Join.
The WebFOCUS Table List dialog box opens.
-
Choose a Master File for the data source you wish to use as
your host file, and click OK.
The Join tool opens showing a Fields window for the host file that you selected.
-
To add a cross-referenced data source to the Join, click the Add
File button.
The WebFOCUS Table List opens again.
- Select a cross-referenced file.
-
Click OK.
A default Join is created if the host and cross-referenced files share appropriate fields. If a default Join is not created, follow the instructions in Customizing a Join to create your own.
-
To open
the Join Properties dialog box, do one of the following:
- In the Join
tool, right-click a join link and select Left Outer Join.
or
- In the Explorer,
right-click a join link and select Properties.
or
- Double-click a join link in the Explorer.
The Join Properties dialog box opens.
- In the Join
tool, right-click a join link and select Left Outer Join.
- Select the Left Outer Join option button.
- Click OK.
The Field list for each data source being joined displays the field names by default. To help you build meaningful joins you can add information about the listed fields.
- With the Join tool open, right-click within a table to view available field options. To change information displayed for tables globally, select Options from the Window menu. Click the Reporting tab and select the appropriate options from the Field List Options area.
-
Select
any or all of the following items: Qualified Names, Name, Alias, Title,
Description, Format. A check mark displays next to your selections.
Name and Descriptions are checked by default.
The selected information categories appear as headings in the field list for each joined file. Details will appear if the corresponding information is included in the Master File.
- Expand the window to see the additional field list columns. Click on column titles if you want to change the sort order.