WebFOCUS
Online Help > Managed Reporting Administrator > Application Integration Topics > Managed Reporting Browser Window Feature
Managed Reporting Browser Window Feature
You can utilize all available JavaScript options for
controlling the appearance of a browser window. Utilizing Java Script
options enables you to customize Web browser windows so they conform
to the application and organizational standards.
Customizing browser windows does not change the default appearance
or functionality of WebFOCUS Managed Reporting. It specifically
enables you to control the browser window appearance and options.
Note: This functionality is only available when using
an Internet Explorer browser.
WebFOCUS Managed Reporting Implementation
You can control the way a browser window looks in Managed
Reporting by adding JavaScript code to the following:
Reference: JavaScript Code
The
following JavaScript code, located in the heading of the HTML logon
pages for Managed Reporting and the OLAP Control Panel file, controls
the default browser window appearance and options.
<script type='text/javascript'>
function doShowDoc(u,t)
{
t=t.replace(' ','A');
window.open(u,t);
}
</script>
where:
- u
Is the URL where the browser window HTML is located.
- t
Is the new browser window name.
Caution: These
parameters are set internally by WebFOCUS and must not be changed.
To customize the appearance of a window created by WebFOCUS
Managed Reporting, you must make manual changes to the JavaScript
code and migrate them to any future version of WebFOCUS.
To customize the browser window, determine the desired browser
window options (for more information, see Browser Window Options) and JavaScript code additions, and add them after
the last parameter in the JavaScript window.open call.
Example: Customizing a Browser Window
If you want to suppress all browser
controls, including the location bar (address or URL), the JavaScript
code presented in JavaScript Code must be changed as follows:
window.open(u,t);
to
window.open(u,t,"location=0");
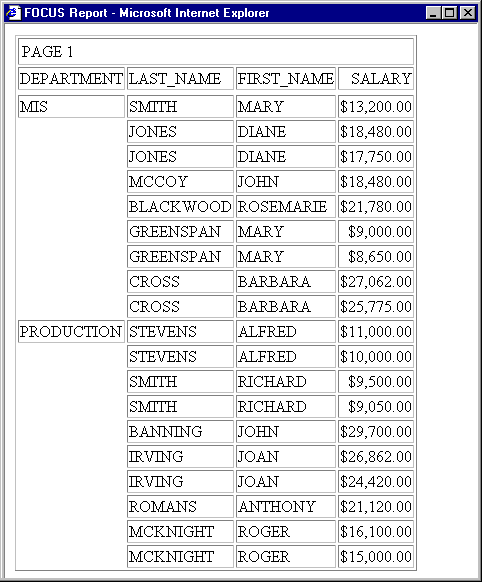
The
following image shows the browser window without controls such as
location bars, toolbars, and scrollbars.
If
you want to suppress the location bar and status bar but display
the scroll bars, you must change the JavaScript code presented in JavaScript Code as follows:
window.open(u,t);
to
window.open(u,t,"location=0,status=0,scrollbars=1");
Procedure: How to Control a Browser Window in the Deferred Report Status Interface
-
Make a backup or copy of xxmrchft.def, located
in drive:\ibi\WebFOCUS76\client76\conf\etc.
Where xx is
the two letter abbreviation for the language you select when you
log on to Managed Reporting.
-
Edit xxmrchft.def,
located in drive:\ibi\WebFOCUS76\client76\conf\etc.
-
Search
for the following string:
window.open
-
Add the
browser option ("location=0") to the window.open options before
the last closing parenthesis. For example, change:
nl,text,window.open(fixurl(aa),name);
to
nl,text,window.open(fixurl(aa),name,"location=0");
Note:
- There are several
instances of window.open. Apply this change to each instance.
- The xxmrchft.def
file is a WebFOCUS internal script file. Each line or continuation
of a line must begin with the text “nl,text”.
-
Clear
the browser cache prior to testing.
You can modify the following browser window options:
- Menu bar
- Toolbar
- Location bar
- Directories
bar
- Status line
- Scroll bars
- Ability to resize
the window
- Closing a child
window when a parent window closes
- Width (in pixels)
- Height (in pixels)
- Screen alignment
(from the left of the screen, from the top of the screen)
When using JavaScript, you must specify all the options you want
in your Managed Reporting browser window. After an option is specified,
there are no assumed default values.
Caution: The first two parameters (u and t) in the window.open
call are set internally by WebFOCUS and must not be changed.
Example: Setting Browser Window Options
The
following example shows how to open a new window, named open_window,
in the upper left corner of the window that displays the front page
of Managed Reporting. The size of the new window will be 640 x 480
pixels. To accomplish this, include the following HTML code in the
head of the original document:
<SCRIPT LANGUAGE=JAVASCRIPT>
function doShowDoc(u,t)
{
t=t.replace(' ','A');
window.open(u,t,menubar,toolbar,location,directories,status,scrollbars,
resizable,dependent,width=640,height=480,left=0,top=0);
}
</SCRIPT>
Browser Window Exceptions
WebFOCUS Managed Reporting does not create a new browser
window when you:
- Right-click
a drill-down link in a WebFOCUS report and select Open.
- Use the Ctrl+N
sequence to create a new browser instance.
- Access the following
administrator tools from Managed Reporting:
-
The ReportCaster Console. When
you run a log report from the Console, the browser options cannot
be controlled, since the applet does not create the browser window.
-
Two-Way Email. When
you run the Job Log or Event Log from the Managed Reporting Two-Way
Email option on the blue toolbar, the browser options cannot be
controlled, because the applet does not create the browser window.
Customizing the Amper Auto-Prompting Facility
You can customize the look and feel of the amper auto-prompting
facility by editing the launch page template file you are using.
All of the available launch page templates are located in the ibi\WebFOCUS76\ibi_html\javaassist\ibi\html\describe directory.
The default template is autoprompt_top.css.
If you want to customize the banner, create an image, save it
in the describe directory, and change the background-image property,
which is shown in bold type in the following Cascading Style Sheet
(CSS) code:
#idBannerDiv {
height:41px;
background-image:url(style/logo_banner_TOP.gif);
background-position:top left;
background-repeat:no-repeat;
margin:0px;
margin-top:0px;
cursor:pointer; }
The option to select different launch page templates can be set
in the WebFOCUS Administration Console using the Parameter Prompting
selection under Client Settings, where you can set the IBIF_describe_xsl
value to one of the launch page templates.
You can also enter the name of the desired launch page template
in a FOCEXEC using the following code:
<describe_xsl>template</describe_xsl>
where:
- template
Is set to one of the following launch
page template values:
- autoprompt_top
- Displays the parameters horizontally at the top of the page and
is the default template value.
- autoprompt_top_checked
- Same as autoprompt_top, but the Run in a new window check
box is preselected.
- autoprompt -
Displays the parameters vertically at the left side of the page.
- autoprompt_checked
- Same as autoprompt, but the Run in a new window check
box is preselected.
- autoprompt_simple
- Basic input form.