WebFOCUS
Online Help > Managed Reporting Administrator > Creating Domains, Groups, Roles, and Users > Creating Users
The Users tab is used by Managed Reporting Administrators to
create, edit, and delete users. Users with Group Administration
privileges have limited access to the Users tab. For more information,
see Assigning the Group Administrator Privilege.
Procedure: How to Create a User
-
In the
Managed Reporting Administration interface, click Users.
-
Click
the New
 icon.
icon.
The New User dialog box opens in the right pane.
-
Enter the General Information:
User ID. The
user ID is used to log on to this user account. The User ID value
can be a maximum of 128 characters and cannot include spaces or double
quotation marks ("). You can also restrict other characters from
this field. For details, see Customizing the Interface.
You can edit the User ID value after
the account is created. This is a required property.
Name. Is the description displayed
for the user account in most areas of Managed Reporting and ReportCaster.
If you have many users, you may consider a convention such as Lastname,
Firstname for values in this field. A good naming convention makes
it easier to locate users in the lists. Name is a required property.
Password/Confirm Password. You
can assign a password for the user account or leave it blank. You
can reset the password for a user at any time. Users can also reset
their own passwords from the logon page. Password/Confirm Password
is an optional property.
Email Address. An
e-mail address is required for the Report Library, but you do not
have to include it for ReportCaster scheduling without using the
Report Library.
In certain Managed
Reporting security configurations, the Name, Email Address, Password,
and Confirm Password fields are disabled because WebFOCUS cannot update
password information stored in the external authentication directory.
For example, when you are configured to authenticate to LDAP/Active
Directory, the Password and Confirm Password fields are disabled
because an MR Administrator cannot update your authentication directory.
Additionally, when configured for LDAP/Active Directory authentication,
RDBMS authorization, and the property USER.INFO.LOOKUP is set to
'dual', the Name and Email Address fields are also disabled because
this user information comes from your authentication directory.
Your WebFOCUS Administrator controls these settings using the WebFOCUS
Administration Console. For more information, see Managed
Reporting Security Settings in the WebFOCUS Security
and Administration manual.
Role. Is
the type of Managed Reporting user. For details on roles, see User Roles Defined.
Disable logon rights for this user. Prohibits
the user from logging into Managed Reporting.
-
Assign
additional Privileges (optional).
After you select a role, a set of privileges is automatically
assigned to the user and cannot be changed. However, you can add
additional privileges as necessary. For details on user privileges,
see User Privileges Defined.
-
Select
the groups for which you want the user to be a member.
To add a user to a group, double-click the group in the
Available Groups list to move it to the Member of list.
-
Click Save.
Note: To
modify or delete a user, select user from the Users tab and click
the appropriate icon.
The Managed Reporting Administration interface supports
the ability to search for entries by name or user ID. Large search
result sets are partitioned into a series of navigable pages to
improve performance.
In the Groups tab, you can perform pattern searches. For example,
you can enter “Sa” and it will return all of the groups that begin
with those two letters. In the Users tab, you can perform pattern
searches by name or user ID.
To restore your list after performing a search, click Refresh
in the browser or type an asterisk (*) in the search text box and
click the green arrow.
Assigning the Group Administrator Privilege
A Managed Reporting administrator can delegate some
administration responsibilities to designated users. Group administration
is a user privilege that enables users to manage one or more of
the groups to which they belong. From the Managed Reporting Administration
interface, group administrators can add or remove any user from the
groups they administer. However, group administrators cannot add,
remove, or change the domains that are associated with their groups.
Group Administrators can also create users and assign them roles
and privileges. However, Group Administrators cannot:
- Assign a role
higher than their own role (from high to low, roles are Developer, Analytical
User, User).
- Assign a privilege
they do not possess.
- Edit existing
users if the user belongs to a group that the Group Administrator
does not administer.
The Group Administrator privilege can be assigned by an administrator
to any user, but the privilege cannot be assigned to a role. A user
can be the Group Administrator for more than one group and there
can be multiple Group Administrators for one group. Group Administrators
use the same Managed Reporting Administration interface that Administrators
do, though the features presented to them are limited.
Procedure: How to Assign the Group Administrator Privilege
-
In the
Managed Reporting Administration interface, click Users.
-
Select
the user you want to grant the administrator privilege to and click the Edit
 icon.
icon.
-
In Group
& Domain Management properties, select the Groups tab.
-
In the
Member of list, select the Group for which you want the user to be
the administrator.
-
Click
the Administrator
 icon.
icon.
An asterisk appears in the Administrator column of the
Member of list to indicate the user is the administrator of the
group.
-
Click Save.
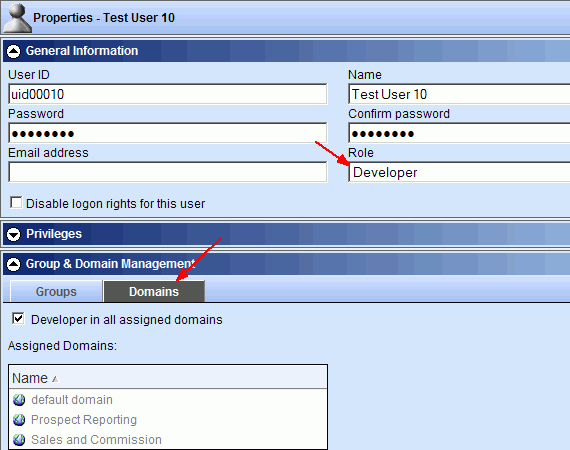
Assigning Development Domains
When a user is assigned the Developer role (or a role
that is based on the Developer role) the Domains tab appears in
the Group & Domain Management area of the User Properties pane.
By default, the Developer in all assigned domains check box is
selected, which means that the user is a developer for all of the
domains for which access has been granted. The domains shown in
the Assigned Domains list are available in the Domain Builder interface (accessed
from the blue Managed Reporting toolbar or in Developer Studio),
the Domains environment, and from Dashboard.
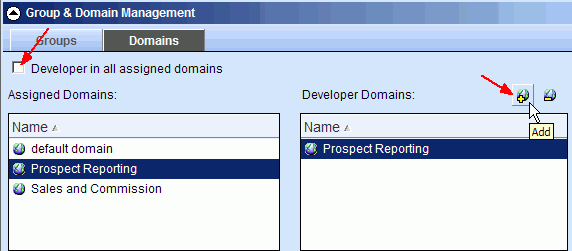
If the Developer in all assigned domains check box is not selected,
you can specify the domains in which the user can develop. Only
the domains listed in the Developer Domains list of the Domains
tab appear in the Domain Builder interface (or Developer Studio).
The domains in the Assigned Domains list of the Domains tab appear
in the Domains interface and in Dashboard.
Enabling Users to Save Parameter Values
You can assign the Save Entered Values privilege to
enable users, when they run reports, to save the parameter values
they select as a My Report. The Save Entered Values privilege is
not enabled by default for any user or role. Note that the Save
Entered Values privilege is not available for the Dashboard Public
User.
The WebFOCUS Client amper auto-prompting feature inserts a Save
Parameters button on the form for users that have the Save Entered
Values privilege. Developers can also add the Save Parameters button
to a form from the HTML Composer. For complete details, see the
WebFOCUS Managed Reporting Developer's Manual.
Note: If the report properties are changed and the Prompt
for Parameters property is not selected, users will not see the
Save Parameters button when they run a report.
Procedure: How to Set Up Users to Save Parameter Values
-
Open
the Managed Reporting Administration interface.
-
For the
user or role, select the Save Entered Values privilege.
-
Click Save to
save your changes.
Note: If a user is currently logged into Managed
Reporting, the user must log off and log on again for the privilege
change to be effective.