WebFOCUS
Online Help > ReportCaster Development and Administration > Creating and Maintaining a Schedule > Schedule Blackout Dates
In this section: Reference: |
Schedule blackout dates are those dates on which schedules cannot
be run or be set to run. Administration
of schedule blackout dates is performed by:
- ReportCaster
Administrators, who can set schedule blackout dates globally, affecting
all ReportCaster users, or exclusively by targeting specific user
groups.
- Managed Reporting
Group Administrators with ReportCaster schedule privileges, who
can set schedule blackout dates for the group(s) they administer.
When managing schedule blackout dates, you can add new blackout
dates, delete and replace the description of existing blackout dates,
and extract existing blackout dates to a file for future use. ReportCaster provides the following ways for you to access these
management options:
-
ReportCaster
Development and Administration
graphical user interface (GUI).
- Schedule Blackout
Dates Import and Extract Utilities. This method provides an alternative
to using the ReportCaster
Development and
Administration GUI, and unlike the GUI, does not require that the Distribution
server be running.
These utilities are available for Windows
and UNIX systems, as follows:
- In Windows,
the utilities are provided in the rcbdimport.bat and rcbdextract.bat files,
located in the ibi\ReportCaster76\bin directory on the drive and
under the directory where WebFOCUS is installed.
If you do a full WebFOCUS client
installation, the import and extract options are available from
the Windows Start Programs menu.
You can also run the utilities
from a command line.
- In UNIX, the
utilities are provided in the rcbdimport and rcbdextract scripts,
located in the ibi/ReportCaster76/bin directory under the directory
where WebFOCUS is installed. The scripts are run from a command line.
The
Import and Extract Utilities can be run in silent mode or in an
interactive mode. Silent mode is useful for running scheduled updates
on off hours and for UNIX systems that do not have an XTERM.
Reference: Schedule Behavior for Blackout Dates
Blackout
dates are enforced during schedule creation and at run time:
- When creating
or editing one of the date fields in a schedule, ReportCaster dynamically checks the first upcoming date on which
the schedule will run to ensure that this date has not been blacked
out. If there is a conflict with the date, an error message appears
and the schedule cannot be saved until the conflict is resolved
by either changing the schedule date or by not blacking out the
date.
- At runtime,
each schedule is checked against the list of blackout dates. If
a blackout date has been defined for the scheduled date, the schedule
will not run. If notification is enabled, a notification is distributed
indicating that the schedule did not run because of a defined blackout
date.
Note: Schedule Blackout
Dates for a specific user include the global blackout dates and
the blackout dates assigned to the group(s) to which the user belongs.
About the Schedule Blackout Dates Import Utility
The Import Utility allows you to import a file that
contains the desired schedule blackout dates, and can also include
instructions to insert, delete, or replace date ranges and descriptions
of blackout dates. You can import a file that you created or a file that
was created using the Extract Utility. For information about extract
files, see About the Schedule Blackout Dates Extract Utility. The import of
blackout dates can be done through the ReportCaster Schedule Blackout Dates user
interface or the Import Utility (in either silent or interactive mode).
To create an import file, use a standard text editor. This section
provides an example of an import file.
The format of the import file is based
on that of the Holiday Function (HDAY), described in the Using Functions manual.
At a minimum, the import file need only consist of the dates
(following the format below) you want to black out. You can also
include comments about the file or specific dates, and add flags
that specify how to process individual dates or a range of dates.
Use the following rules to create the content of a Schedule Blackout
Dates import file:
- Start a comment
line with the pound sign (#). Comment lines are optional.
- Enter dates
in the YYYYMMDD format. For example, May 1, 2007 = 20070501.
- Each date must
be on a separate line. Dates do not have to be in chronological order.
- To add a comment
about a specific date, add a space after the date entry, then type
your comment. For example, 200070101 New Years Day. Comments are optional.
- Include the
following instruction flags, as needed. Flags can be used multiple
times in a file.
Note: Use the flags when you want to perform different
tasks on different dates within a single import file. Otherwise,
you can choose to add or delete all dates specified in the import
file while using the import utility, described later in this section.
The following is an example of an import file that includes a
comment, an insert, and a date range:
#Schedule Blackout Dates Update - Import File
$INSERT
20070101 New Years Day
20070115 Martin Luther King Day
$INSERT
$RANGE BEGIN
20070226 Winter School Break Begins
$RANGE END
20070302 Winter School Break Ends
Trace information is written to the ReportCaster
Servlet trace file.
About the Schedule Blackout Dates Extract Utility
The extract option allows you to save existing schedule
blackout dates in a text file to use as reference documentation
or as a schedule blackout dates import file. The extract utility
generates an extract file that includes a comment line with information about
the extract followed by a list of the extracted blackout dates.
The date format is the same as that in the import file (YYYYMMDD).
Extracting blackout dates can be done through the ReportCaster Schedule Blackout Dates user interface or the Extract
Utility (in either silent or interactive mode).
The default name of an extract file is rcbdextract_GroupName_YYMMDD_HHMMSS.txt, which
includes the group name, and date
and time stamp, as follows:
- GroupName is either Global or the name
of the group from which the dates were extracted.
- YY is the year.
- MM is the month.
- DD is the day.
- HH is the hour.
- MM is the minute.
- SS is the second.
The following is an example of an extract
file:
#ReportCaster Schedule Blackout Date Extract created
#070208 180618 by admin for date range:(All)
#Dates extracted from Group: Sales_NE
20070101
20070115 Martin Luther King Day
20070125
20070219
20070220
20070221
20070222
20070223
20070226 Winter School Break Begins
20070227
20070228
20070301
20070302 Winter School Break Ends
20070425
Trace information is written to the ReportCaster
Servlet trace file.
Managing Schedule Blackout Dates From the ReportCaster User Interface
To access the Schedule Blackout
Dates graphical user interface, click the Schedule Blackout
Dates link on the ReportCaster Development and Administration
Interface, shown in the following image.

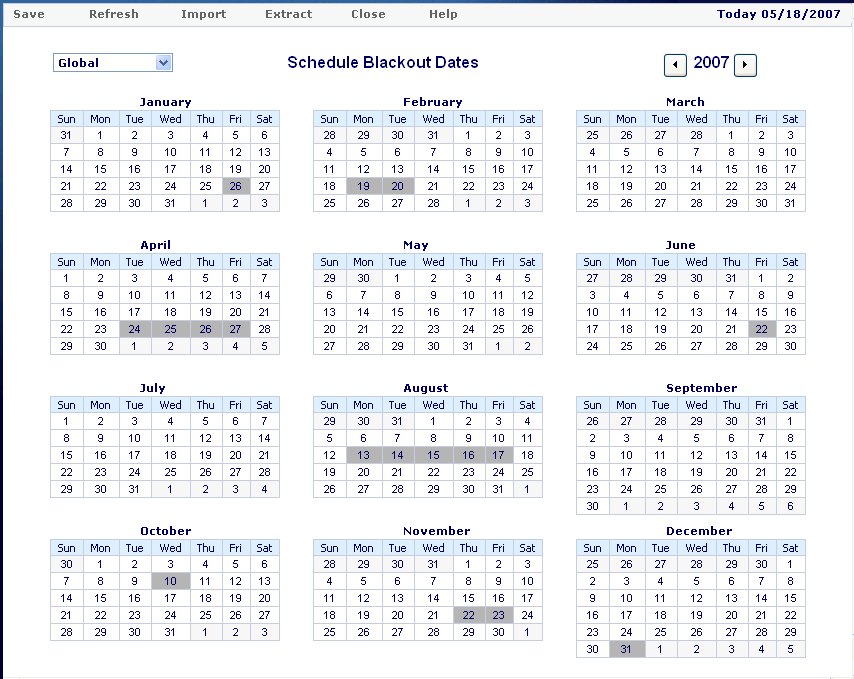
The Schedule Blackout Dates interface opens to a calendar of
the current year, the group drop-down
list in the top left corner is selected with Global, and the global schedule
blackout dates are shaded gray in the calendar. The following image shows
an example of an initial view of the Schedule Blackout Dates interface.
As a ReportCaster Administrator, you can
define site-wide (global) schedule blackout dates, as well as blackout
dates for any group in the system. The group drop-down list provides
a selection all applicable groups including Global.
As a Managed Reporting Group Administrator with schedule privileges,
you can set and manage blackout dates for only those groups that
you administer. The group drop-down list provides a selection of
applicable groups. Global schedule blackout dates are available
for viewing only. For details on configuring a Managed Reporting
Group Administrator, see the Managed Reporting Administrator’s Manual.
Note: Global schedule blackout dates
apply to all users and are, therefore, included with the group-specified
blackout dates for a group.
When you select a group from the drop-down
list, the calendar refreshes and displays the selected group blackout
dates, which are shaded in yellow, along with the global blackout
dates, shaded in gray.
When defining schedule blackout dates, you can only flag a date
as available or unavailable. By default, all dates are available. Any day can be both a group and global schedule
blackout date. Calendars are only applicable for the year they
are defined. If you define dates only for 2007, when 2008 arrives
you must set the blackout dates for the new year. Any date can be both a global and a group-specific
blackout date.
If a blackout date was defined through a file import and that
date included a description, you can view that description by positioning
the cursor over the date in the calendar. Updates to a description
are made in an import file, which is brought into the Schedule Blackout
Dates through the Import Utility.
Note: Non-administrators can view the information in the
Schedule Blackout Dates interface, but they cannot define blackout
dates.
The options available from the Schedule
Blackout Dates user interface are:
-
Group drop-down list. Appears in
the top-left corner. Allows you to select specific groups to administer.
-
Year Display. Appears
in the top-right corner. Allows you to select a calendar year.
-
Save. Saves changes to blackout
date selections.
-
Refresh. Refreshes
the view to show the most current blackout dates.
-
Import. Opens
the Import Blackout Dates utility from which you can import a file
that contains blackout dates.
-
Extract. Opens
the Extract Blackout Dates utility from which you can extract all
or selections of the existing blackout dates and save them in a
file.
-
Close. Closes
the Schedule Blackout Dates interface.
The following procedures explain how to define, import, and extract
schedule blackout dates using the Schedule Blackout Dates interface.
Procedure: How to Define Blackout Dates Using the Interface Calendar
To
define blackout dates from the ReportCaster Schedule Blackout Dates calendar:
-
Select
the year using the arrows next to the year display that appears
in the top right corner.
-
Select a group from the drop-down
list in the top-left corner.
Note: Only a ReportCaster Administrator can set
Global schedule blackout dates.
-
In the
calendar, click the dates you want to black out.
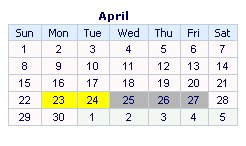
If you are choosing global dates,
the day on the calendar turns gray. If you are choosing a group
blackout date, the day on the calendar turns yellow. The following image
shows an example of global (April 23 and 24) and group (April 25
through 27) schedule blackout dates.
Note: Global schedule blackout
dates apply to all groups. Any day can be both a global and group-specific
blackout date.
-
Click Save.
A confirmation window opens to tell you that the dates
have been saved.
-
Click OK.
The
blackout dates you saved appear in the Schedule Blackout Dates calendar.
Procedure: How to Import Schedule Blackout Dates in the User Interface
To
import schedule blackout dates in the user interface:
-
In the Schedule Blackout Dates interface,
select Import from the options that appear
in the top left corner.
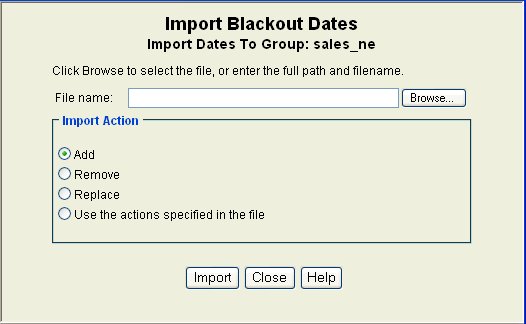
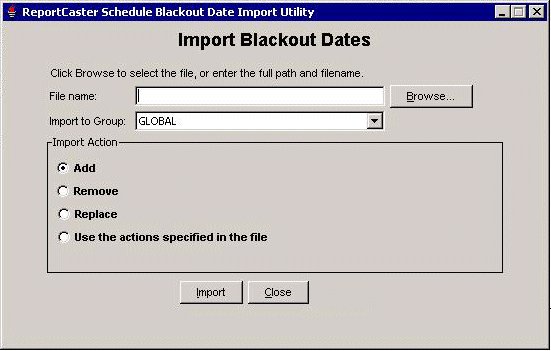
The Import Blackout Dates dialog box opens, as shown in
the following image. The group name to
which you are importing the blackout dates appears at the top of
the window.
-
In the
File Name field, type the full path to the file, or click Browse and
navigate to the file you want to import.
-
Select
an Import Action.
-
Add. Add
the dates specified in the import file to the blackout dates.
-
Remove. Delete
the dates specified in the import file from the blackout dates.
-
Replace. Updates
the description of the specified dates.
-
Use the actions specified in the file. Use
this option when the import file contains a combination of commands
(add, remove, replace) and date ranges.
-
Click Import.
The following confirmation message is displayed:
Blackout Dates have been successfully imported. Select Save on the Schedule Blackout Dates toolbar to save the changes.
-
Click OK.
-
In the
Schedule Blackout Dates option menu, click Save.
Note: The imported blackout date changes do not
take effect until you save them.
-
In the
save confirmation window, click OK.
The
Schedule Blackout Dates calendar is updated with the blackout date changes.
Procedure: How to Extract Schedule Blackout Dates in the User Interface
To
extract schedule blackout dates from existing blackout dates in
the user interface:
-
In the
Schedule Blackout Dates interface, select Extract from
the options that appear in the top left corner.
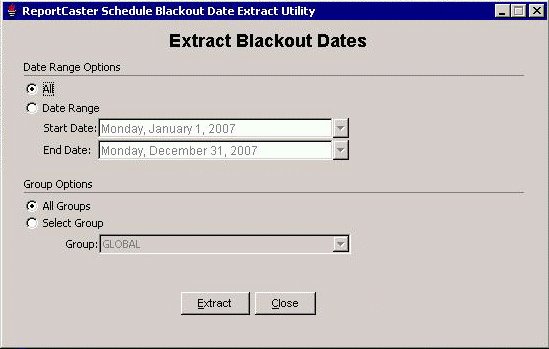
The Extract Blackout Dates dialog box opens, as shown in
the following image. The group name from
which you are extracting the blackout dates appears at the top of
the window.
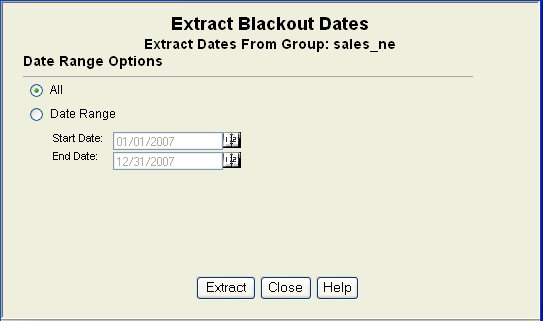
-
Select All to
extract all currently saved blackout dates, or select Date
Range to specify the range of dates you want to extract.
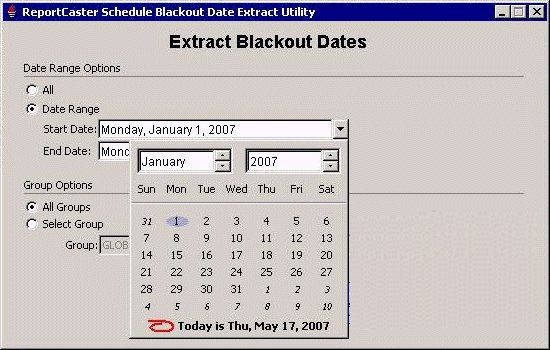
If you select Date Range:
-
Click the calendar icon to the right of the Start Date field.
A calendar dialog box opens, as shown in the following
image.

-
Choose the date that begins your date range by selecting the month
and year from the drop-down menus, then clicking the day in the calendar.
The Start Date calendar closes and your selection appears
in the Start Date field.
-
Click the calendar icon to the right of the End Date field.
-
Choose the date that ends your date range by selecting the month
and year from the drop-down menus, then clicking the day in the calendar.
The End Date calendar closes and your selection appears
in the End Date field.
-
Click Extract.
A window opens asking if you want to open or save the file.
If
you choose to save the file:
-
Click Save.
-
In the Save As window, browse to the directory where you want to
save the extract file, and click Save.
Note: The
default extract file name is rcbdextract_GroupName_YYMMDD_HHMMSS.txt, where GroupName is the name of the group the
blackout dates are extracted from, YYMMDD and HHMMSS are the
date (year, month, day) and time (hour, minute, second) that the
file was created.
Using the Import and Extract Utility in Silent Mode
You can run the Import and Extract Utility in silent
mode in a Windows or UNIX environment using a customized .bat file
or UNIX script. The following procedures describe how to import
and extract schedule blackout dates using the utility in silent mode.
Procedure: How to Use the Import Utility in Silent Mode
-
Copy
the import file (for Windows) or script (for UNIX):
The Windows import file is rcbdimport.bat, located
in the ibi\ReportCaster76\bin directory on the drive and under the
directory where WebFOCUS is installed.
The UNIX
import script is rcbdimport, located in the ibi/ReportCaster76/bin
directory under the directory where WebFOCUS is installed.
-
In the
copied file, edit the following call to specify the import file,
import action, and, optionally, a group:
For Windows:
java -cp “%CLASSPATH%” ibi.broker.BlackoutDatesUtilities-Import
  %DSINSTALL% [-group=”groupname”] <import file> <action>
For
UNIX:
java -cp $CLASSPATH ibi.broker.BlackoutDatesUtilities-Import
  $DSINSTALL [-group=”groupname”] <import file> <action>
where:
- groupname
Group is an optional parameter, where groupname is the name
of the group to which you want to import blackout dates.
When
group is not used, the utility will import dates using the GLOBAL group.
You cannot import dates to multiple groups.
- import file
Is the path and file name of the file you want to import.
- action
Is one of the following actions:
- add
- remove
- replace
- common (use
the actions specified in the import file)
-
Save
the file or script.
A message informs you that the import was successful.
-
Run
your edited version of the import utility.
Note: If
you run the import file without DSINSTALL and the file location
and action parameters, the Java help information opens for the utility.
Procedure: How to Use the Extract Utility in Silent Mode
-
Copy
the extract file (for Windows) or script (for UNIX):
The Windows extract file is rcbdextract.bat, located
in the ibi\ReportCaster76\bin directory on the drive and under the
directory where WebFOCUS is installed.
The UNIX
extract script is rcbdextract, located in the ibi/ReportCaster76/bin
directory under the directory where WebFOCUS is installed.
-
In the
copied file, edit the following call to specify the extract file,
extract option, and, optionally, a group:
For Windows:
java -cp “%CLASSPATH%” ibi.broker.BlackoutDatesUtilities-Extract
   %DSINSTALL% [-group=”groupname”]<extract file> <option>
For
UNIX:
java -cp $CLASSPATH ibi.broker.BlackoutDatesUtilities-Extract
   $DSINSTALL [-group=”groupname”]<extract file> <option>
where:
- groupname
Group is an optional parameter, where groupname is the name
of the group from which you want to extract blackout dates.
When
group is not used, the utility will extract dates using the GLOBAL group.
Use “*” to extract blackout dates from
all groups. A separate file is created for each group.
- extract file
Is the path and file name of the file created by the extract.
- option
Is one of the following:
- All - specifies
to extract all current blackout dates.
- YYYYMMDD YYYYMMDD
- specifies to extract a range of dates, where YYYYMMDD is the year,
month and day.
For example, from
a Windows system, if you want to extract the blackout dates that occur
between October 30, 2007 and January 29, 2008 from
a group named Sales NE and save them to the C drive in a file
named bdExtract, the call will be:
java -cp “%CLASSPATH%” ibi.broker.BlackoutDatesUtilities-Extract
  %DSINSTALL% group=”Sales NE” C:\bdExtract 20071030 20080129
-
Save
the file or script.
A message informs you that the extract was successful.
-
Run
your copied version of the extract utility.
Note: If
you run the import file without %DSINSTALL% and the file location
and action parameters, the Java help information opens for the utility.
Using the Import and Extract Utility in Interactive Mode
You can run the Import and Extract Utility in an interactive
mode in a Windows or UNIX environment using a customized .bat file
or UNIX script. The following procedures describe how to import
and extract schedule blackout dates using the utility in interactive
mode.
Procedure: How to Use the Import Utility in Interactive Mode
Use
the following procedure to run the Schedule Blackout Dates Import
Utility for both Windows and UNIX systems. The images shown in this
procedure are from the Windows version of the utility. Although
Windows and UNIX interactive dialog boxes may vary in the look and
feel, they contain the same options and buttons described here.
-
Run
the Import Utility, as follows:
- In Windows,
do one of the following:
From the Start menu, select Information
Builders, ReportCaster76, Database
Management and Utilities, then Import Schedule
Blackout Dates.
In a command line window, navigate
to the ibi\ReportCaster76\bin directory, then type rcbdimport.
In
Windows Explorer, navigate to the ibi\ReportCaster76\bin directory
and double-click the rcbdimport.bat file.
- In UNIX, on
the command line, run the following script:
rcbdimport
The
Import Blackout Dates dialog box opens, as shown in the following
image.
-
In the
File name field, type the path to the file you want to import, or click Browse to
navigate to the file.
-
From the Import to Group drop-down
list, select the group you want to import to.
-
Select
one of the import actions:
-
Add. Inserts
the blackout dates noted in the import file.
-
Remove. Deletes
the blackout dates noted in the import file.
-
Replace. This
option allows you to add or edit a description for an existing blackout
date.
-
Use the action specified in the file. Act
on the blackout dates according to the instructions in the import
file. This option allows you to use add, remove, and replace in
one file, and to use date ranges.
-
Click Import.
The ReportCaster Schedule Blackout Dates Import
Log window opens, displaying information about the import, such as
the name of the imported file, and the time and date of the import.
The following image shows an example of an import log file.

-
In the
log window, click Close.
You are returned to the Import Blackout Dates dialog box.
-
Click Close to
exit the Import Blackout Dates utility.
Procedure: How to Use the Extract Utility in Interactive Mode
Use
the following procedure to run the Schedule Blackout Dates Extract
Utility for both Windows and UNIX systems. The images shown in this
procedure are from the Windows version of the utility. Although
Windows and UNIX interactive dialog boxes may vary in the look and
feel, they contain the same options and buttons described here.
-
Run the Extract Utility, as follows:
- In Windows,
do one of the following:
From the Start menu, select Information
Builders, ReportCaster76, Database
Management and Utilities, then Extract Schedule
Blackout Dates.
In a command line window, navigate
to the ibi\ReportCaster76\bin directory, then type rcbdextract.
In
Windows Explorer, navigate to the ibi\ReportCaster76\bin directory
and double-click the rcbdextract.bat file.
- In UNIX, in
the command line, navigate to the ibi\ReportCaster76\bin directory,
then run the following script:
rcbdextract
The
Extract Blackout Dates dialog box opens, as shown in the following
image.
-
Select
either All or Date Range.
All. Extract all currently saved schedule blackout
dates.
Date Range. Extract the blackout dates within
the specified date range.
If you select
Date Range:
-
Click the arrow next to the Start Date field.
The Extract Blackout Dates Calendar opens, as shown in
the following image.
-
In the calendar, click the date you want to begin the date range.
-
Click the arrow next to the End Date.
The Extract Blackout Dates Calendar opens.
-
In the calendar, click the date you want to end the date range.
-
From the Group Options, select the
group you want to extract the blackout dates from. Select either All
Groups or select a specific group from the Group drop-down
list.
-
Click Extract.
The following message appears:
Extract of schedule blackout dates successfully created.
-
Click OK.
A file
containing the extracted blackout dates with the following file
name format is saved in the \ReportCaster76\log directory:
rcbdextract_GroupName_YYMMDD_HHMMSS.txt
Where GroupName is the name
of group you are extracting the blackout dates from, YYMMDD is
the year, month, and day the file was created, and HHMMSS is
the hour, minute, and second the file was created.