WebFOCUS
Online Help > Creating Reports With Report Assistant > Working With Data and Data Sources > Working With Joins
A join is a temporary connection between two or more data sources
that share at least one common field. Once you join two data sources,
each time WebFOCUS retrieves a record from the first data source (host
file), it also retrieves the matching records from the second data
source (target file).
You use the Join tool to link data sources in both Report Assistant
and Graph Assistant. The Join tool provides a graphical method for
creating and manipulating joins. You can also create define-based
joins and multi-field joins.
When you access the Join tool, the window displays a field list
for the host data source (which you specified when you created the Standard
Report or Reporting Object), and a field list for any target
data source you add to the window.
Important:
- Only Managed Reporting Administrators
and Developers have access to the Join options tab. The Join options tab is only available
to Analytical Users with the Advanced privilege when creating a
Custom Report. The Join options tab is not available in self-service
mode.
- The Join options tab is not available
in the Report Assistant or Graph Assistant. You can only create
joins using the Join tool available in Reporting Objects.
Procedure: How to Create a Join
-
Click the Join options tab in Report
Assistant or Graph Assistant and click New.
The WebFOCUS masters list dialog box opens where you select a
target data source.
-
Select a data source and click OK.
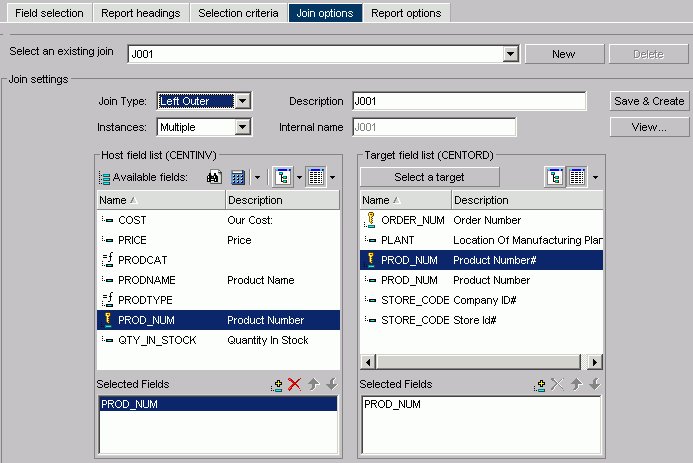
The following image shows the Join settings window where
you select fields from the Host field and the Target field lists
to create a join.
-
Select the fields you want to join from the Host field list
and the Target field list and add them to their respective Selected
Fields boxes.
or
Press Alt+M to go to the
Host field list.
or
Press Alt+T to
go to the Target field list.
Then, tab to the field and press Enter to
add the chosen field to the corresponding Selected Fields box.
Note: Fields
must have the same format and be indexed fields in order to use
them to create joins.
-
Select your join properties:
-
Unspecified.
This option is selected in the Join properties
when a join that was created in a release earlier than Version 7,
Release 1 is opened in the Join tool. In versions prior to Version
7 Release 1, the defaults for join type and other operators were
assumed and not specified in the generated code. Since the Join
tool cannot determine the type of join that was created and if there
were other commands set to control the join, select the appropriate
options (Inner Join, Left Outer Join, Multiple Instances, Single
Instances) from the Join tool to upgrade the generated code.
-
Inner Join. A
join that results when a report includes host rows that have corresponding
cross-referenced rows.
-
Left Outer Join. Extends
the results of an Inner Join and retrieves records from both host
and cross-referenced tables, including all records from the left
table (host) and any records from the right table (cross-referenced)
where the condition values match. If there are no matching values
in the cross-referenced table, the join still retrieves records
from the host table.
-
Multiple Instance (formerly Non Unique). A
one-to-many join structure that matches one value in the host data
source to multiple values in the cross-referenced field. Joining
employee ID in a company's employee data source to employee ID in
a data source that lists all the training classes offered by that company
would result in a listing of all courses taken by each employee,
or a joining of the one instance of each ID in the host file to
the multiple instances of that ID in the cross-referenced file.
The default join type is inner.
-
Single Instance (formerly Unique). A
one-to-one join structure that matches one value in the host data
source to one value in the cross-referenced data source. Joining
an employee ID in an employee data source to an employee ID in a salary
data source is an example of a unique join.
-
To see the join syntax, click View.
-
Click OK.
-
In the Description box, give the join a meaningful and unique
name.
-
Click Save & Create and the new
join appears in the Joins list.
Procedure: How to Create a Define-based Join
-
Click the Join options tab in Report
Assistant or Graph Assistant and click New.
The WebFOCUS masters list dialog box opens where you select a
target data source.
-
Select a data source and click OK.
-
Click the down arrow of the Define icon and then click New define
field.
The following image shows the list of Define field options.
The following image
shows the Define Field Creator dialog box where you create the Define
expression.
-
Create the defined field. The new define field appears in the
Available fields list. The field is prefixed with the define
symbol.
-
Add the defined field and the target field to their respective
Selected Fields boxes.
Note: Fields must have the same format and be indexed
fields in order to use them to create joins.
-
If you want to see the syntax, click View to display
the define-based join syntax.
-
Give the join a meaningful and unique name in the Description box.
-
Click Save & Create. The new join
appears in the Joins list.
Procedure: How to Create Multi-field Joins
-
Click the Join options tab in Report
Assistant or Graph Assistant and click New.
The WebFOCUS masters list dialog box opens where you select a
target data source.
-
Select a data source and click OK.
-
Enter multiple fields in the Host field list box and one field
in the Target field list box.
-
If you want to see the syntax, click View to display
the multi-field join syntax.
-
In the Description box, give the join a meaningful and unique name.
-
Click Save & Create.
The new join appears in the Joins list.
Procedure: How to Delete a Join
-
Select a join from the Select an existing join list box.
-
Click Delete.
Procedure: How to Edit a Join
-
Select a join from the Select an existing join list box.
-
Make your desired changes.
-
Click Save & Create.